.png)
.png)

7 Actionable DIY Heat Press Projects: A Step-by-Step Guide for 2025
September 16, 2025
Abstract
The practice of heat transfer application has evolved from an industrial process into an accessible craft, empowering individuals and small enterprises to create customized goods. This guide examines the methodologies behind successful do-it-yourself (DIY) heat press projects in 2025, providing a comprehensive framework for hobbyists and professional artisans. It deconstructs the core principles of heat, pressure, and time, which form the foundational triad of any heat transfer process. The analysis extends to a comparative study of different transfer materials, such as heat transfer vinyl (HTV), sublimation inks, and Direct-to-Film (DTF) transfers, clarifying their respective applications and limitations. Through a series of seven detailed project tutorials—ranging from basic T-shirt customization to complex, multi-material applications on apparel and ceramics—this document offers a structured pedagogy. It aims to cultivate not just procedural skill but a deeper conceptual understanding, enabling the user to troubleshoot common issues and innovate beyond the provided examples, thereby transforming a heat transfer machine from a mere tool into a conduit for creative expression.
Key Takeaways
- Master the three pillars of heat pressing: accurate temperature, consistent pressure, and precise timing for flawless results.
- Understand the fundamental differences between HTV, sublimation, and DTF to choose the right material for your fabric or substrate.
- Prepare your design files properly, considering mirroring for HTV and color profiles for sublimation to avoid costly mistakes.
- Always perform a test press on a scrap piece of material to calibrate your settings before committing to the final item.
- Explore a variety of DIY heat press projects to build your skills, from simple shirts to complex layered designs.
- Maintain your equipment, including cleaning the platen and checking for even pressure, to ensure its longevity and performance.
- Use quality substrates and transfer materials; the final product's durability is only as good as its weakest component.
Table of Contents
- Understanding Your Heat Press Machine
- The Language of Heat Transfer: Materials and Methods
- Project 1: The Classic Custom T-Shirt with Heat Transfer Vinyl (HTV)
- Project 2: The Personalized Mug with Sublimation
- Project 3: The Custom Cap or Hat for Curved Surfaces
- Project 4: The Multi-Material Tote Bag
- Project 5: Sublimating on Polyester Sportswear
- Project 6: Creating Custom Ceramic Coasters
- Project 7: Advanced Layering for Intricate Apparel Designs
- Frequently Asked Questions (FAQ)
- Conclusion
- References
Understanding Your Heat Press Machine
Embarking on the path of custom creation begins with a thorough understanding of your primary instrument. A heat press machine is not simply a device that gets hot; it is a precision tool that orchestrates a delicate dance between temperature, pressure, and time. To neglect any one of these elements is to invite inconsistency and failure into your work. Let us begin by deconstructing these core principles, for in their mastery lies the foundation of every successful DIY heat press project you will undertake.
The Core Principles: Time, Temperature, and Pressure
Imagine you are baking a cake. You would not simply place it in an oven set to a random temperature for an arbitrary duration. You follow a recipe that specifies the exact heat and time required for the ingredients to transform chemically into a delicious final product. The same logic applies with unwavering rigor to a heat press. The "recipe" is dictated by the type of transfer material you are using and the substrate (the item you are pressing onto) you have chosen (Offnova, 2021).
Temperature: This is the energy that activates the adhesive on heat transfer vinyl (HTV) or turns sublimation ink from a solid into a gas. Too little heat, and the transfer will not adhere properly, peeling away after a single wash. Too much heat, and you risk scorching the garment, melting the vinyl, or causing the colors in your sublimation print to look faded or "blown out." Different brands and models can have different heat distributions, so what works for one machine might need adjustment on another (xTool, 2024). It is wise to use an infrared temperature gun to verify that your machine's displayed temperature matches the actual surface temperature of the platen, as discrepancies are common.
Pressure: This is the force that ensures intimate contact between the transfer material and the substrate. It pushes the adhesive into the fibers of a shirt or ensures the sublimated gas penetrates the polymer coating of a mug. Inconsistent pressure leads to patchy transfers, where some parts adhere perfectly while others fail. On a clamshell or swing-away press, this is controlled by a pressure adjustment knob. On a combo heat press machine, ensuring the correct platen is fitted securely is paramount. Think of it as a firm, even handshake. Too light, and the connection is weak; too firm, and you can damage the texture of the fabric or even the item itself.
Time: This is the duration for which heat and pressure are applied. It is the catalyst that allows the chemical reaction of adhesion or sublimation to complete. A few seconds too short, and the process is incomplete. A few seconds too long, and you risk the same issues as excessive heat—scorching, melting, or color shifting. The timer on your heat press machine is one of its most valuable features, providing the consistency that a household iron could never offer.
Types of Heat Presses: From Clamshell to Combo Machines
The market offers a variety of machine styles, each with its own ergonomic and functional profile. Your choice of machine will influence your workflow and the types of DIY heat press projects you can most easily accomplish. A comprehensive buying guide can help delineate the specific features of each type (Stahls', 2025).
- Clamshell: This is often the entry-point for many crafters. The top platen hinges at the back and opens up like a clamshell. Its primary advantage is a smaller physical footprint, making it ideal for spaces where room is at a premium. However, the angular opening means the rear of the platen is always closer to the lower platen than the front, which can make precise placement of transfers a bit more challenging as you have less direct overhead access.
- Swing-Away: In this design, the top platen swings out horizontally, away from the lower platen. This provides a completely unobstructed view of your workspace, making it far easier to arrange your garment and transfer with precision. They are generally considered safer as your hands are never working directly under the hot platen. The trade-off is that they require a larger operational footprint to accommodate the swinging motion.
- Draw: A hybrid design, the draw press allows the lower platen to slide out towards the operator like a drawer. This offers the same easy access for layout as a swing-away but often within a more compact frame.
- Combo Heat Press Machine: This is the multi-tool of the heat press world. These versatile units come with interchangeable platens, allowing you to press not only flat items like shirts but also mugs, plates, and hats. A single machine base powers different attachments, offering a cost-effective and space-saving solution for those wishing to explore a wide variety of DIY heat press projects without purchasing multiple dedicated machines. For a beginner or a crafter with diverse interests, this type of heat transfer machine is often the most logical starting point.
A Word on Safety and Workspace Preparation
Working with a heat transfer machine involves temperatures high enough to cause severe burns. Treat it with the same respect you would a hot stove.
- Ventilation: Your workspace should be well-ventilated. While most modern HTV is low in emissions, some materials can release fumes when heated. This is especially true when working with sublimation, which is a chemical process.
- Clear Space: Ensure the area around your press is clear of clutter. You need unimpeded space to operate the machine and handle hot items. Keep flammable materials far away from the press.
- Electrical Supply: Heat presses draw a significant amount of power. Plug your machine directly into a wall outlet that can handle the amperage. Avoid using extension cords, as they can be a fire hazard and may not deliver consistent power, affecting the machine's heating capability.
- Heat-Resistant Gloves: While not always necessary for standard shirt pressing, a pair of heat-resistant gloves is invaluable when handling freshly pressed mugs or ceramic tiles, which retain heat for a long time.
The Language of Heat Transfer: Materials and Methods
Before you can bring your creative visions to life, you must become fluent in the language of the materials you will be using. The two dominant dialects in the world of DIY heat press projects are Heat Transfer Vinyl (HTV) and Sublimation. They are fundamentally different technologies, and understanding their unique properties is the key to selecting the right method for your project.
Heat Transfer Vinyl (HTV) vs. Sublimation: A Tale of Two Technologies
Choosing between HTV and sublimation is not a matter of which is "better," but which is appropriate for the task at hand. One is a material that sits on top of the fabric, while the other becomes part of the fabric itself.
| Feature | Heat Transfer Vinyl (HTV) | Dye-Sublimation |
|---|---|---|
| Mechanism | A layer of vinyl with heat-activated adhesive is applied to the surface of the substrate. It sits on top of the material. | Solid ink is turned into a gas that permanently dyes the polymer fibers or coating of the substrate. It becomes part of the material. |
| Feel | Can be felt as a distinct layer on the fabric. The texture varies from smooth and plastic-like to soft and velvety (flock). | No feel whatsoever. The surface of the substrate remains completely unchanged to the touch. |
| Compatible Materials | Very versatile. Works on cotton, polyester, cotton/poly blends, leather, and more. Available in a wide range of colors. | Requires polyester or a special polymer coating. Works best on 100% polyester (for apparel) or pre-coated hard goods (mugs, tiles). |
| Color Limitations | Limited to the solid colors of vinyl you have. Complex multi-color designs require layering multiple pieces of vinyl. | Allows for full-color, photorealistic prints. Gradients, shadows, and intricate patterns are easily reproduced. Prints onto white or light-colored substrates only. |
| Durability | Very durable but can potentially crack, peel, or fade after many wash cycles, especially if not applied correctly. | Extremely permanent. The design is infused into the material and will not crack, peel, or fade. It is as durable as the fabric itself. |
| Initial Setup | Requires a vinyl cutter to cut the design from a sheet of vinyl. The excess vinyl must then be "weeded" away. | Requires a sublimation printer with special sublimation ink and sublimation paper. No cutting or weeding is needed. |
Think of it this way: HTV is like painting on a wall. The paint is a separate layer applied to the surface. Sublimation is like staining wood. The stain soaks in and becomes one with the wood, changing its color permanently without adding a surface layer.
Understanding Direct-to-Film (DTF) Transfers
A third player gaining significant traction is Direct-to-Film, or DTF. This process represents a hybrid approach that combines some of the best qualities of HTV and sublimation. With DTF, a special printer prints a design onto a clear film. A powdered adhesive is then applied to the back of the wet ink. This film can then be pressed onto a garment using a standard heat press machine.
The major advantage of DTF is that it offers the full-color, photorealistic printing of sublimation but with the material versatility of HTV. You can apply complex, multi-color designs to cotton, polyester, blends, and dark-colored fabrics without any cutting or weeding. The feel is typically softer and more flexible than traditional HTV. While setting up a DTF printing system is a significant investment, many suppliers now sell pre-printed DTF transfers, making this technology accessible for DIY heat press projects.
Choosing the Right Substrate: Fabric, Ceramic, and Beyond
The item you press onto is called the substrate. Its composition is the single most important factor in determining which transfer method to use.
- Cotton and Cotton Blends: These are the domain of HTV and DTF. Cotton is a natural fiber and has no polymers for sublimation ink to bond with. If you try to sublimate on 100% cotton, the image will look faded and will wash out almost completely.
- 100% Polyester: This is the ideal fabric for sublimation. The polyester fibers open up when heated, allowing the gaseous sublimation ink to penetrate and bond permanently. The result is a vibrant, zero-feel design. It is perfect for sportswear, flags, and other synthetic textiles.
- Ceramics, Metal, and Wood: These hard substrates can only be decorated via sublimation if they have been treated with a special polymer coating. You cannot take any old mug off the shelf and sublimate on it. You must purchase "sublimation blanks"—mugs, coasters, aluminum sheets—that are specifically manufactured for this process.
- Hats and Caps: These present a unique challenge due to their curved surface. A dedicated hat heat press machine or a hat press attachment for a combo machine is required. These have a curved lower platen (buck) and a corresponding curved upper platen to ensure even heat and pressure across the front of the cap.
Now that we have established a firm conceptual grounding in the tools and materials, let us apply this knowledge to a series of practical, step-by-step DIY heat press projects. Each project will build upon the last, introducing new skills and reinforcing core principles.
Project 1: The Classic Custom T-Shirt with Heat Transfer Vinyl (HTV)
This is the quintessential starting point for any aspiring heat press artist. Creating a custom T-shirt with HTV teaches the entire core workflow: design preparation, cutting, weeding, and application. It is a project with a low barrier to entry that provides an immediate and satisfying result.
Materials and Equipment
- Heat Press Machine: A clamshell, swing-away, or combo press will work perfectly.
- Cutting Machine: A desktop craft cutter (like a Cricut or Silhouette) or a more professional vinyl plotter.
- T-Shirt: A 100% cotton or cotton/poly blend shirt is ideal. Pre-wash the shirt without fabric softener to remove any sizing or chemicals from the manufacturing process.
- Heat Transfer Vinyl (HTV): Choose a standard "easy-to-weed" type for your first project. It comes on a clear, shiny carrier sheet.
- Weeding Tool: A tool that looks like a dental pick, used for removing the unwanted pieces of vinyl.
- Teflon Sheet or Parchment Paper: To protect your garment from direct contact with the hot platen.
- Ruler or T-Shirt Guide: To ensure proper placement of your design.
Design and Preparation: The Digital Foundation
Before you ever turn on your heat press machine, your project begins on a computer. Your design software is where your idea takes shape. For this first project, let's imagine a simple one-color text design, perhaps a favorite quote or a name.
- Create Your Design: In your cutting machine's software, type out your text. Choose a font that is not excessively thin or complex. Very fine lines can be difficult to cut and weed for a beginner.
- The Critical Step: Mirroring: This is the most common mistake for newcomers. Because you are cutting the design on the back of the HTV, you must flip your design horizontally before sending it to the cutter. If you do not mirror the design, your text will be backward on the final shirt. Think of it as creating a stamp; the stamp itself is a mirror image of the final impression.
- Cutting the HTV: Place the HTV onto your cutting mat with the shiny carrier sheet side down. The duller, adhesive side should be facing up towards the blade. Load the mat into your cutting machine and send the mirrored design to be cut. Your machine's software will have presets for different types of HTV, which control the blade depth and cutting force.
The Physical Craft: Weeding and Placement
Once your design is cut, the tactile part of the process begins. This is where patience pays dividends.
- Weeding: This is the process of removing all the vinyl that is not part of your design. Start by peeling away the large area of excess vinyl around your text. Then, use your weeding tool to carefully pick out the small pieces inside the letters (like the centers of 'O's, 'A's, and 'P's). Work under good lighting. If you are having trouble seeing the cut lines, you can try gently flexing the vinyl or holding it up to a light source.
- Pre-Pressing the Shirt: Set your heat press to the temperature and time recommended by your HTV manufacturer (a common starting point is 150-160°C for 15 seconds). Place your T-shirt on the lower platen. Press it for 3-5 seconds. This pre-press does two important things: it removes any residual moisture from the fabric and it smooths out any wrinkles, creating a perfect surface for your transfer.
- Positioning the Design: Take your weeded HTV design, which is still on its sticky carrier sheet. Position it on the shirt. The carrier sheet holds everything in place. A common placement for a center chest design is about three to four fingers' width down from the collar. Use a ruler or a placement guide to ensure it is centered and straight. The sticky backing of the carrier sheet will hold it lightly in place.
The Moment of Truth: Pressing the Transfer
With everything in place, it is time to apply the heat.
-
Cover and Press: Cover the entire design area with a Teflon sheet or a piece of parchment paper. This protects the garment from any potential marks from the upper platen and prevents the HTV carrier sheet from melting if it were to accidentally touch the hot metal.
-
Engage the Press: Close the heat press and lock it down. The timer should start automatically. It is vital that you have set the correct pressure beforehand. For standard HTV, you want a medium, firm pressure. You should feel some resistance when closing the handle, but you should not have to strain excessively.
-
The Peel: Once the timer beeps, open the press. Now, you must consult your HTV's instructions to know if it is a "hot peel," "warm peel," or "cold peel" vinyl. This is a critical detail.
- Hot Peel: You peel the carrier sheet off immediately while the shirt is still on the press and very hot.
- Warm Peel: You remove the shirt from the press, wait a few seconds (5-10), and then peel.
- Cold Peel: You must wait until the shirt and transfer are completely cool to the touch before peeling. Peeling a cold-peel vinyl while it is still warm can lift the design right off the shirt.
Peel the carrier sheet back at a 45-degree angle with a smooth, consistent motion. If you see any part of the vinyl lifting with the carrier sheet, stop. Lay the carrier sheet back down, cover with your Teflon sheet, and press again for another 5-7 seconds. This usually resolves any adhesion issues.
Congratulations! You have just completed your first DIY heat press project. Let the shirt cure for at least 24 hours before washing it inside out in cold water. This allows the adhesive to fully set, ensuring a long-lasting design.
Project 2: The Personalized Mug with Sublimation
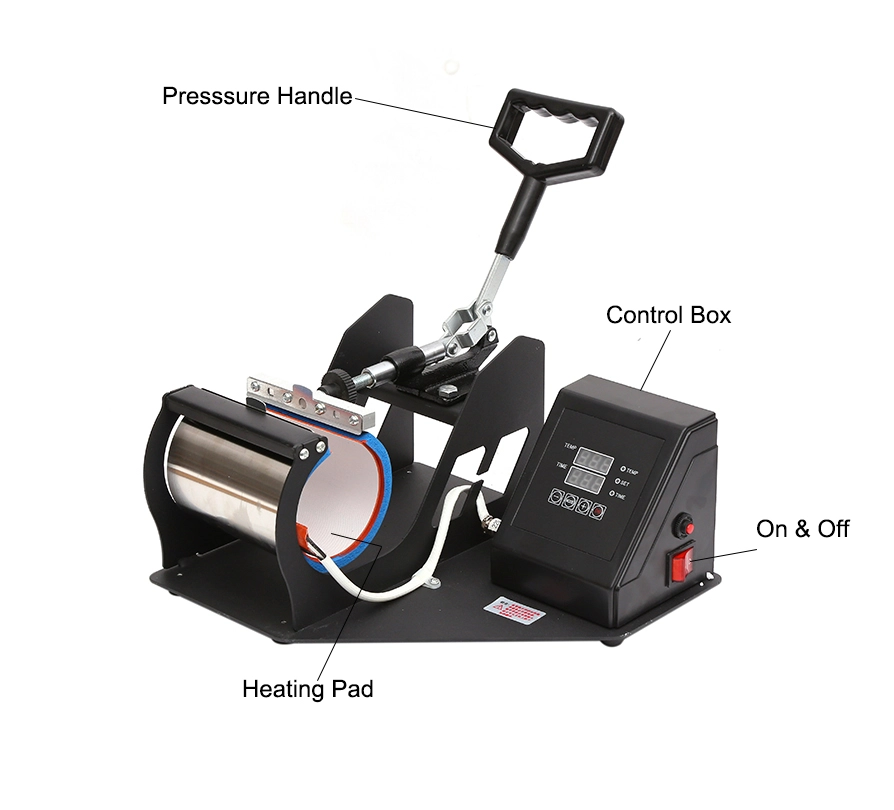
This project introduces a new dimension to your crafting: three-dimensional objects and a completely different transfer technology. Sublimation on a mug is a magical process. There is no vinyl, no layers, just a permanent, vibrant image that becomes part of the mug's surface. This requires a dedicated mug press machine or the mug attachment from a combo heat press machine.
Materials and Equipment
- Mug Press Machine or Attachment: This device wraps around the mug to provide even heat and pressure.
- Sublimation Printer: A printer (often an Epson model) filled with special sublimation ink instead of regular printer ink.
- Sublimation Paper: This paper is designed to release the sublimation ink as a gas when heated.
- Sublimation Mug Blank: A ceramic mug that has a special polymer coating. A standard mug will not work.
- Heat-Resistant Tape: This special tape can withstand the high temperatures of the press and is used to hold the design in place.
- Heat-Resistant Gloves: Mugs get extremely hot and retain heat for a long time.
- Design Software: Any graphic design software capable of printing in high resolution (e.g., Adobe Photoshop, Affinity Designer, GIMP).
Design and Printing: The Color Challenge
Sublimation allows for full-color, photographic prints, but it comes with its own set of rules. Color management is paramount.
- Get Your Dimensions: Measure the height and circumference of your mug's printable area. Create a document in your design software that matches these dimensions. Many mug blank suppliers provide templates.
- Create Your Design: This is where sublimation shines. You can use photos, complex logos with gradients, or intricate patterns. Remember that sublimation ink looks dull and unsaturated on the paper. Do not be alarmed; the colors will become vibrant and pop to life during the heating process.
- Color Profiles (ICC Profiles): This is a more advanced but important concept. The colors you see on your screen may not match the final printed output due to differences between your monitor, printer, and inks. To achieve accurate color, you need to use an ICC profile, which is a small file that tells your computer how to translate the screen colors into the correct ink mixture for your specific printer, ink, and paper combination. Your ink or paper supplier will usually provide this file and instructions on how to install and use it.
- Mirror and Print: Just like with HTV, you must mirror your design before printing. Print your design onto the sublimation paper using your sublimation printer. Use high-quality print settings.
Wrapping and Preparing the Mug
This stage is all about precision. A poorly wrapped mug will result in blurry edges or "ghosting."
- Trim the Paper: Cut your printed design out, leaving a small border if you wish, but for a full bleed (edge-to-edge) design, trim it precisely to the edges.
- Position on the Mug: Ensure the mug surface is clean and free of dust or fingerprints. Wrap the printed paper tightly around the mug with the printed side facing the ceramic. The design should be straight and centered.
- Tape Securely: Use heat-resistant tape to secure the paper to the mug. Do not be shy with the tape. A piece along the seam is essential. Add small pieces of tape along the top and bottom edges to ensure the paper is held flush against the mug surface everywhere. Any gap between the paper and the mug will result in a blurry or faded spot, as the gas will not transfer correctly.
The Sublimation Transformation
The mug press applies heat from the sides, unlike the top-down pressure of a T-shirt press.
- Set Up Your Mug Press: Set your mug press to the recommended temperature and time for your mug blanks. A typical setting is around 190-200°C for 180-210 seconds. The pressure should be firm enough that the mug is held securely, but not so tight that you risk breaking the mug's handle when closing the press.
- Pre-heat the Press: Allow your mug press to come fully up to temperature.
- Press the Mug: Carefully place the prepared mug into the press and clamp it shut. The timer will begin. You might smell a slight chemical odor as the ink turns to gas; this is normal, but ensure your space is ventilated.
- The Reveal: When the timer goes off, open the press. Using your heat-resistant gloves, carefully remove the mug. It will be incredibly hot. Place it on a heat-resistant surface. You can either peel the paper off immediately or wait for it to cool slightly. Peeling it hot can help prevent any residual gas from re-settling on the mug and causing a faint "ghost" image.
- Cooling: The mug must cool completely before it can be handled safely. You can let it air cool or, for some types of mugs, plunge it into a bucket of warm water to cool it quickly and stop the sublimation process, which can sometimes sharpen the image. Check your mug supplier's recommendations on this.
Once cool, your design is now a permanent, glossy, and completely smooth part of the mug. It is dishwasher and microwave safe, showcasing the incredible durability of sublimation. This successful DIY heat press project opens the door to a whole world of personalized hard-surface goods.
Project 3: The Custom Cap or Hat for Curved Surfaces
Decorating headwear introduces the challenge of working with a curved, structured surface. A standard flat heat press is ill-suited for this task. The uneven surface prevents the consistent pressure required for a successful transfer. This is the domain of a dedicated hat heat press machine or a combo press with a hat attachment. This project will build on your HTV skills from Project 1 and adapt them to this new geometry.
Materials and Equipment
- Hat Heat Press Machine or Attachment: This is non-negotiable. It must have a curved upper platen and a lower form (called a buck) that matches the shape of a hat's front panel.
- Blank Hat or Cap: Choose a cap with a smooth, unstructured or lightly structured front panel for your first attempt. Heavily structured caps with a thick central seam can be more challenging.
- Heat Transfer Vinyl (HTV): A flexible, stretchable HTV is often recommended for hats to better conform to the curve.
- Cutting Machine and Weeding Tools: The same as for the T-shirt project.
- Teflon Sheet or Cover Sheet: A flexible one that can drape over the curve.
- Heat-Resistant Tape: Useful for holding the design in place on the slippery, curved surface.
Design Considerations for a Curved Canvas
Designing for a hat is different from designing for a flat T-shirt. The canvas is smaller and has a distinct shape.
- Size Matters: The printable area on the front of a cap is typically no more than 6 cm high and 10-12 cm wide. Your design must fit within this space. A simple, bold design often has more impact than a complex, detailed one.
- Mind the Seam: Many "baseball" style caps have a seam running down the center of the front two panels. While it is possible to press over this seam, it can create a pressure gap. For your first project, it is wise to create a design that either avoids the seam or incorporates it cleverly (e.g., a design with two distinct elements on either side of the seam).
- Mirror and Cut: As with any HTV project, you must mirror your design before sending it to your cutting machine. Cut the design from your chosen HTV and weed away the excess material.
Mastering the Mount: Securing the Hat
The most critical part of using a hat heat press machine is properly securing the cap onto the lower buck.
- Open the Hat: Flip down the sweatband on the inside of the cap. This will expose the inner surface of the front panel.
- Position on the Buck: Stretch the front of the cap over the lower buck. The goal is to make the front panel as flat and taut as possible against the curved form. Most hat presses have a tensioning lever or clip that holds the back of the hat, pulling it tight.
- Smooth It Out: Ensure there are no wrinkles or folds in the area you intend to press. The smoother the surface, the more even the pressure and the better the final transfer.
- Pre-Press: Close the press for 3-5 seconds. This helps to flatten the area further and removes any moisture.
- Place Your Design: Carefully position your weeded HTV transfer onto the front of the cap. The curved and often slippery fabric can make this tricky. This is where heat-resistant tape can be a lifesaver. Use a small piece on the top and bottom of the carrier sheet to keep the design from shifting.
Pressing on a Curve
The application process is similar to a flat press, but the feel and alignment are different.
- Set Your Press: Refer to your HTV manufacturer's guidelines for temperature and time. Settings for hats are often similar to shirts (e.g., 150-160°C for 15 seconds), but sometimes a slightly shorter time is used due to the direct, focused heat.
- Pressure Check: Pressure is key. It needs to be firm enough to press the design into the fabric but not so extreme that it leaves a permanent crease or mark from the edge of the platen. You should feel solid contact across the entire design area when you close the press.
- Cover and Press: Cover the design with a flexible Teflon sheet and close the press. Engage the lock and wait for the timer to complete.
- Peel with Care: Open the press. Following your vinyl's instructions (hot, warm, or cold peel), carefully remove the carrier sheet. Because of the curve, it is often best to peel from one corner, pulling smoothly across the design.
- Address Imperfections: If you notice the texture of the fabric weave is very prominent in the vinyl, or if the edges seem a little weak, you can do a quick post-press. Place your Teflon sheet directly over the vinyl (with the carrier sheet removed) and press for another 2-3 seconds. This helps to melt the vinyl into the fabric weave for a more professional, screen-printed look and improves durability.
By successfully personalizing a hat, you have conquered the challenge of non-flat surfaces. This skill is directly transferable to other curved or awkwardly shaped items, such as the sleeves of a shirt or the leg of a pair of pants, expanding the range of your DIY heat press projects.
Project 4: The Multi-Material Tote Bag
This project elevates your skills by introducing the complexity of combining different types of HTV on a single item. We will create a custom tote bag using both standard HTV and a specialty vinyl, like glitter or foil. This teaches you about layering, managing different temperature requirements, and creating visually dynamic designs.
Materials and Equipment
- Flat Heat Press Machine: A clamshell or swing-away is perfect.
- Blank Tote Bag: A canvas or cotton tote bag is an excellent, inexpensive substrate.
- Standard HTV: One color for the base of your design.
- Specialty HTV: A sheet of glitter, holographic, or metallic foil HTV.
- Cutting Machine, Weeding Tools, Teflon Sheet: Your standard HTV toolkit.
The Principles of Layering
Not all HTV can be layered. This is a rule you must internalize.
- The Bottom Layer Rule: Standard, smooth HTV can almost always be a bottom layer.
- The Top Layer Rule: Specialty vinyls like glitter, flock (velvety texture), and holographic vinyls generally cannot be layered on top of. Their textured or uneven surfaces do not provide a good base for another layer's adhesive. They must be the top-most element of any design.
- The Exception: You can often layer standard HTV on top of other standard HTV.
For our project, let's design a tote bag that says "MARKET" in a simple block font (using standard HTV) with a glittery apple design next to it. Since the elements are side-by-side and not overlapping, we can press them simultaneously if they have similar heat requirements.
A more advanced layering concept is the "knockout" method. If you wanted the glitter apple to overlap the word "MARKET," you would not press the glitter on top of the standard vinyl. Instead, in your design software, you would subtract the shape of the apple from the letters. This way, each piece of vinyl presses directly onto the fabric, fitting together like a puzzle. This is the professional standard for multi-color designs.
Design and Preparation for Multiple Materials
- Create the Full Design: In your software, lay out the word "MARKET" and the apple graphic exactly as you want them to appear on the final bag.
- Separate the Elements: Separate the design into its component parts based on the material. You will have one file for the text (to be cut from standard HTV) and one file for the apple (to be cut from glitter HTV).
- Mirror and Cut Both: Remember to mirror both design files before cutting. Cut each design from its respective material.
- Weed Both Designs: Weed the text and the apple. You may notice that glitter HTV is often thicker and requires a slightly different feel to weed compared to standard vinyl.
The Two-Press Method
Often, different types of HTV have slightly different temperature or time requirements. The safest way to combine them is to press them separately. Glitter HTV, for example, often requires a higher temperature and longer press time than standard HTV.
- Pre-Press the Bag: Place the tote bag on your press and pre-press for 5 seconds to remove moisture and wrinkles.
- Position the First Layer: Let's press the standard HTV text first. Position the "MARKET" design on the bag.
- The "Tack" Press: We are not going to press this layer for the full time. We only want to "tack" it down long enough for the adhesive to grab so we can peel off the carrier sheet. Set your press to the standard vinyl's recommended temperature (e.g., 150°C). Press for only 2-3 seconds.
- Peel the Carrier: Open the press and, following the vinyl's peel instructions (hot/warm/cold), carefully remove the carrier sheet. The vinyl should be stuck to the bag, but it is not fully cured yet.
- Position the Second Layer: Now, carefully position the glitter apple design. Its carrier sheet can overlap the already-pressed standard vinyl without issue.
- The Final Press: Cover the entire design (both the new glitter element and the already-tacked text) with your Teflon sheet. Set your press to the temperature and time required for the second material (the glitter HTV, which might be 160°C for 20 seconds). Press for the full recommended time.
- Final Peel: Open the press and peel the carrier sheet from the glitter vinyl according to its instructions.
This final, full-duration press serves two purposes: it fully applies the glitter vinyl and it completes the curing process for the standard vinyl that was only tacked down initially. You have now created a multi-material design that has more texture and visual interest. This technique is fundamental to producing more complex and valuable DIY heat press projects.
Project 5: Sublimating on Polyester Sportswear
This project takes the sublimation skills you learned with the mug and applies them to apparel. We will be decorating a 100% polyester T-shirt, the kind often used for athletic wear. This introduces new challenges, such as preventing dye migration and managing the stretch of performance fabrics.
Materials and Equipment
- Flat Heat Press Machine
- Sublimation Printer, Ink, and Paper
- 100% Polyester T-Shirt: Must be white or a very light color (e.g., light grey, pastel yellow). Sublimation ink is transparent, so it cannot be seen on dark-colored fabrics.
- Butcher Paper or Blowout Paper: This is different from the parchment paper used with HTV. It is uncoated paper used inside and on top of the shirt to absorb any excess ink that "blows out."
- Heat-Resistant Tape
- Design Software
The Science of Fabric and Ink
Why 100% polyester? As we discussed, the sublimation process relies on dyeing polymer fibers. Cotton has no polymers, so the ink has nothing to bond with. On a 50/50 cotton/poly blend, the ink will only bond to the 50% polyester, resulting in a faded, "vintage" look after the first wash as the ink on the cotton washes away. For vibrant, permanent colors, 100% polyester is the only choice for apparel.
A potential issue with colored polyester fabrics is dye migration. This happens when the dye used to color the polyester fabric itself gets reactivated by the heat of the press and bleeds into your sublimated design, discoloring it. For example, pressing a white design onto a red polyester shirt could result in a pink design. This is why white polyester is the safest starting point. For colored polyesters, using special "sub-block" transfers or lower press temperatures is an advanced technique.
Preparation: Precision is Protection
- Design and Print: Create your full-color design in your software. Remember to use your ICC profile for accurate color. Mirror the design and print it on your sublimation paper.
- Prepare the Shirt and Paper: Set your heat press to the recommended settings (e.g., 195-200°C for 45-60 seconds).
- Insert Blowout Paper: Place a sheet of butcher paper inside the T-shirt. This is crucial. It prevents the sublimating ink from bleeding through the front of the shirt and onto the back.
- Pre-Press: Place the shirt (with the paper inside) on the press and press for 5-7 seconds to remove moisture and wrinkles.
- Position and Tape: Lint-roll the surface of the shirt one last time. Even a tiny speck of lint can block the sublimation gas, leaving a small white un-printed spot. Place your printed design face down onto the shirt. Tape it securely in place with heat-resistant tape. Unlike HTV, the sublimation paper is not sticky, so it will slide around easily if not taped.
The Pressing Process: A Light Touch
- The Protective Sandwich: Place the prepared shirt on the lower platen. Place another sheet of butcher paper on top of the sublimation print. This top sheet protects your heat platen from any ink that might blow out from the edges of the paper. You should now have a sandwich: bottom platen, shirt, paper inside shirt, sublimation print taped to shirt, top sheet of butcher paper, top platen.
- Pressure Setting: Sublimation requires very light pressure. If the pressure is too heavy, it can cause the ink to spread too much, resulting in blurry lines. It can also leave press lines on the sensitive polyester fabric. You want just enough pressure to ensure good contact.
- Press: Close the press for the specified time.
- The Reveal: When the timer ends, open the press. Remove the butcher paper from the top. With one swift motion, peel off the sublimation paper. Do not let it slide or shift as you lift it, as this can cause "ghosting."
- Remove from Heat: Immediately remove the shirt from the press and take the paper out from inside.
The result is a stunning, vibrant design with absolutely no feel to it. You can stretch the fabric, and the design stretches with it without cracking. It is now a permanent part of the garment. Mastering this process is key for anyone interested in the popular sportswear or "athleisure" markets, a significant area for DIY heat press projects.
Project 6: Creating Custom Ceramic Coasters
Let's return to hard-surface sublimation but move back to a flat application. This project, creating custom ceramic coasters, reinforces the principles of sublimation learned with the mug but applies them using a standard flat heat press. It demonstrates the versatility of a good quality flat press and a combo heat press machine.
Materials and Equipment
- Flat Heat Press Machine
- Sublimation Coaster Blanks: Ceramic or sandstone coasters with the required polymer coating.
- Sublimation Printer, Ink, and Paper
- Heat-Resistant Tape
- Butcher Paper
- Heat Pad or Silicone Mat: This is important. A rubbery, heat-resistant pad provides a soft cushion for the hard coaster, ensuring even pressure and preventing the ceramic from cracking.
Design and Substrate Nuances
- Design for a Bleed: Coasters are small, so bold graphics, monograms, or photos work well. When you create your design, make it slightly larger than the coaster itself. This is called a "bleed." By printing a bleed, you ensure that even if your placement is off by a millimeter, you will still have color going all the way to the edge of the coaster, with no accidental white border.
- Mirror and Print: As always with sublimation, mirror your design and print it on sublimation paper.
- Prepare the Coaster: The surface of the coaster must be perfectly clean. Wipe it with a soft cloth to remove any dust.
The Pressing Setup for Hard Goods
Pressing a rigid object like a ceramic tile is different from pressing a soft T-shirt.
- Build Your Pressing Sandwich: The order is important. On your lower platen, place down your heat pad/silicone mat. On top of that, place a sheet of butcher paper.
- Position and Tape: Place your printed design on the butcher paper, with the ink side facing up. Now, place the coaster face down onto the print. Carefully align it. The bleed in your print gives you some margin for error. Use heat-resistant tape to tape the coaster to the paper, holding it firmly in place.
- Complete the Sandwich: Place another sheet of butcher paper on top of the coaster. Your full sandwich, from bottom to top, is: lower platen -> silicone pad -> butcher paper -> sublimation print (ink up) -> coaster (face down) -> butcher paper -> top platen.
- Set Your Press: Sublimation on ceramics requires high heat and a longer dwell time. A common starting point is 200°C for 240-300 seconds. Pressure should be medium.
- Press: Close the press and wait for the (long) countdown.
- The Hot Reveal: When the timer finishes, open the press. The coaster will be extremely hot. Using heat-resistant gloves, carefully lift the coaster and paper off the press. Place it on a heat-safe surface and peel away the paper.
You will be left with a glossy, vibrant, and incredibly durable coaster. The image is permanently infused into the coating. This same technique can be used for a wide range of flat sublimation blanks, like photo slates, metal signs, and keychains, making it a valuable skill for expanding your range of DIY heat press projects.
Project 7: Advanced Layering for Intricate Apparel Designs
Our final project is a culmination of the skills learned so far. We will create a complex, multi-color T-shirt design that involves layering multiple colors of standard HTV and incorporating a specialty vinyl, using the professional "knockout" method. This project requires precision in both the digital design phase and the physical application.
Materials and Equipment
- Flat Heat Press Machine
- Blank T-Shirt
- Multiple Colors of Standard HTV: Let's say black, white, and red.
- One Specialty HTV: Let's use silver foil.
- Advanced Design Software: Software that allows you to easily subtract one shape from another (e.g., Adobe Illustrator, CorelDRAW, or the designer editions of Silhouette Studio).
- All your standard HTV tools.
The "Knockout" Design Method
Imagine we want to create a design of a red circle, with a white star inside it, and the word "SHINE" in black across the middle of the star. To top it off, we want a silver foil outline around the whole circle.
If we simply layered these, we would have four layers of vinyl in the center (fabric -> red -> white -> black -> foil). This would be incredibly thick, stiff, and prone to failure.
Instead, we will "knock out" the shapes from each other.
- Create the Base Shapes: Start with the red circle, the white star, the black text, and a silver outline shape.
- Knock Out the Star: Select the white star and the red circle. Subtract the star's shape from the circle. You are now left with a red "donut" shape.
- Knock Out the Text: Select the black text and the white star. Subtract the text's shape from the star. You are now left with a star shape that has a "SHINE"-shaped hole in it.
- Final Components: Your final cut files will be:
- The red "donut" shape.
- The white star with a hole in it.
- The black text "SHINE".
- The silver foil outline.
When these are all pressed, each piece of vinyl will adhere directly to the T-shirt fabric, fitting together perfectly with no overlapping layers. This results in a design that is lightweight, flexible, and durable.
The Multi-Stage Pressing Process
This requires careful planning and a series of short "tack" presses followed by a final cure.
- Pre-Press the Shirt: You know the drill. 5 seconds to remove moisture and wrinkles.
- Press the Largest Element First: The red "donut" is our foundational piece. Position it on the shirt. Cover with a Teflon sheet. Press for only 2-3 seconds at its recommended temperature (e.g., 150°C). Peel the carrier sheet.
- Fit the Next Piece: Now, take the weeded white star shape. Its carrier sheet will still be on. Carefully place it inside the red donut. The clear carrier sheet allows you to see through and align it perfectly. The star should fit right into the hole you created.
- Tack the Second Piece: Cover and press again for just 2-3 seconds. Peel the white vinyl's carrier sheet.
- Fit the Third Piece: Now take the black "SHINE" text. Place it into the void left in the middle of the white star.
- Tack the Third Piece: Cover and press for 2-3 seconds. Peel the carrier sheet.
- Apply the Specialty Vinyl Last: Finally, place the silver foil outline around the design. Because foil is often a specialty material, it should be the top layer (even though in this knockout design nothing is technically 'on top').
- The Final, Curing Press: Cover the entire assembled design with your Teflon sheet. Now, press for the full time and temperature required for the last material you applied (the foil), which might be 15-20 seconds. This final press fully cures all the previously tacked-down layers at once.
- The Final Peel: Following the foil's peel instructions (many foils are cold peel), wait for the design to cool completely before removing the final carrier sheet.
You have now created a professional-grade, multi-color, multi-material design that is far superior to a simple stacked-layer approach. This technique is the gateway to producing truly intricate and high-value custom apparel, representing the pinnacle of HTV-based DIY heat press projects.
Frequently Asked Questions (FAQ)
Why is my HTV peeling off after washing? This is almost always due to one of three factors: inadequate pressure during application, incorrect temperature, or not waiting 24 hours before the first wash. Revisit the specific time, temperature, and pressure settings recommended for your brand of vinyl. Also, ensure you did not use fabric softener when pre-washing the shirt, as it can leave a residue that blocks the adhesive.
Can I use a regular household iron instead of a heat press machine? While you can technically apply HTV with an iron, it is not recommended for consistent or professional results. An iron cannot provide the uniform temperature or, most importantly, the consistent, heavy pressure across the entire design that a heat press can. This often leads to parts of the design peeling up. For sublimation, an iron is completely unusable.
What is the difference between a combo heat press machine and buying separate machines? A combo heat press machine offers versatility and saves space by using one central unit with interchangeable attachments for mugs, hats, plates, and flat items. It is a cost-effective solution for beginners. Separate, dedicated machines (e.g., a standalone mug press machine or hat press machine) are typically built for higher volume and may offer more robust, specialized features for a business focusing on one type of product.
My sublimation colors look wrong. What's happening? Color issues in sublimation are common and usually stem from color management. First, ensure you are using an ICC profile specific to your printer, ink, and paper combination. Second, remember that the colors on the printed paper will look dull; they only become vibrant after pressing. If the final colors are still off (e.g., blues look purple), it is likely an ICC profile issue or you are printing from a program that is not correctly utilizing the profile.
How do I prevent the square press box mark on my shirts? A faint rectangular impression can sometimes be left on garments, especially on sensitive fabrics like polyester or fleece. To minimize this, use a Teflon "pillow" or a foam pad inside the shirt. This raises the print area so that only that part of the shirt makes firm contact with the platen, and the edges of the platen do not press down hard on the surrounding fabric. Reducing pressure can also help.
Conclusion
The journey through these seven DIY heat press projects has taken us from the foundational act of creating a simple T-shirt to the complex orchestration of a multi-material, knockout design. We have navigated the distinct worlds of HTV and sublimation, adapting our techniques for flat fabrics, curved hats, and cylindrical mugs. The central theme that emerges is not one of mere mechanical operation, but of informed artistry. A heat press machine is a powerful tool, but its potential is only realized through a deep understanding of the interplay between time, temperature, and pressure, and a fluent knowledge of the materials you command (Heat Press Nation, 2021).
Each project was designed to be more than a set of instructions; it was intended as a practical lesson in a core concept—be it mirroring, layering, color management, or working with non-flat surfaces. The true goal is to move beyond simply replicating these projects and to internalize the principles behind them. When a transfer fails, you should now have the conceptual framework to diagnose the problem. Was the pressure uneven? Was the temperature too high for that specific fabric? Did I use sublimation ink on a cotton shirt? This ability to troubleshoot and adapt is the hallmark of a true craftsperson. Your journey as a heat printer is just beginning (Stahls', 2025). The skills you have developed are scalable, applicable to countless products from team uniforms to personalized bags, limited only by your imagination (Stahls', 2025). Continue to experiment, to test, and to create.
References
American Psychological Association. (2025). In-text citations. APA Style. Retrieved from
Heat Press Nation. (2021). TruePrint DTF application instructions. Retrieved from
Offnova. (2021). How to use the OFFNOVA im·Pression Heat Press Machine? Offnova Help Center. Retrieved from
Stahls'. (2025). Getting started with a heat press. Retrieved from
Stahls'. (2025). Heat press buying guide. Retrieved from
Stahls'. (2025). How to become a heat printer. Retrieved from
xTool. (2025). The ultimate guide to HTV heat press settings. xTool Academy. Retrieved from