.png)
.png)

A 7-Step Professional Guide: How to Heat Press on a Hat in 2025
December 18, 2025
Abstract
Applying custom designs to headwear through heat pressing is a nuanced process that merges creative expression with technical precision. This comprehensive examination details the methodology for successfully using a heat press on a hat, a procedure that requires specific equipment and a deep understanding of material interactions. The process involves selecting an appropriate hat and heat transfer material, preparing a digital design, and calibrating a specialized hat heat press machine for optimal temperature, pressure, and time. Key challenges, such as navigating the curved surface of the cap and avoiding application errors like scorching or creasing, are addressed through a systematic, step-by-step approach. This guide analyzes the critical variables at each stage, from design preparation to the final peel, offering troubleshooting solutions for common issues. The objective is to provide both hobbyists and professional apparel decorators with a robust framework for producing durable, high-quality, and aesthetically pleasing custom hats, transforming a seemingly complex task into a replicable and mastered skill.
Key Takeaways
- Use a dedicated hat press with a curved platen for even pressure distribution.
- Pre-press the hat for 3–5 seconds to remove moisture and wrinkles before applying the design.
- Secure your transfer with heat-resistant tape to prevent it from shifting on the curved surface.
- Always consult the manufacturer's guide for your specific heat transfer material's settings.
- Follow our detailed guide on how to heat press on a hat for professional-looking, lasting results.
- Perform a second press for 2–3 seconds after peeling to enhance durability and finish.
- Test your settings on a sample piece or an inconspicuous area before pressing the final product.
Table of Contents
- Step 1: Assembling the Essential Apparatus and Materials
- Step 2: The Genesis and Preparation of Your Design
- Step 3: Precision Calibration of Your Heat Press for Headwear
- Step 4: Mastering the Art of Securing the Hat
- Step 5: The Climactic Moment of Application
- Step 6: The Unveiling—Peeling and Finalizing the Press
- Step 7: A Scholarly Approach to Troubleshooting Common Hat Pressing Flaws
- Frequently Asked Questions
- Conclusion
- References
Step 1: Assembling the Essential Apparatus and Materials
Embarking on the journey of hat customization is not unlike an artist preparing their studio or a scientist their laboratory. The quality of the final creation is inextricably linked to the quality and suitability of the tools and materials at one's disposal. A haphazard collection of supplies will almost certainly yield frustrating and inconsistent results. Therefore, a deliberate and informed approach to assembling your toolkit is the foundational first step toward mastering the craft of how to heat press on a hat. This involves a thoughtful consideration of not just the heat press itself, but also the hat that will serve as your canvas, the transfer material that will form your art, and the smaller, yet equally vital, accessories that ensure a smooth workflow.
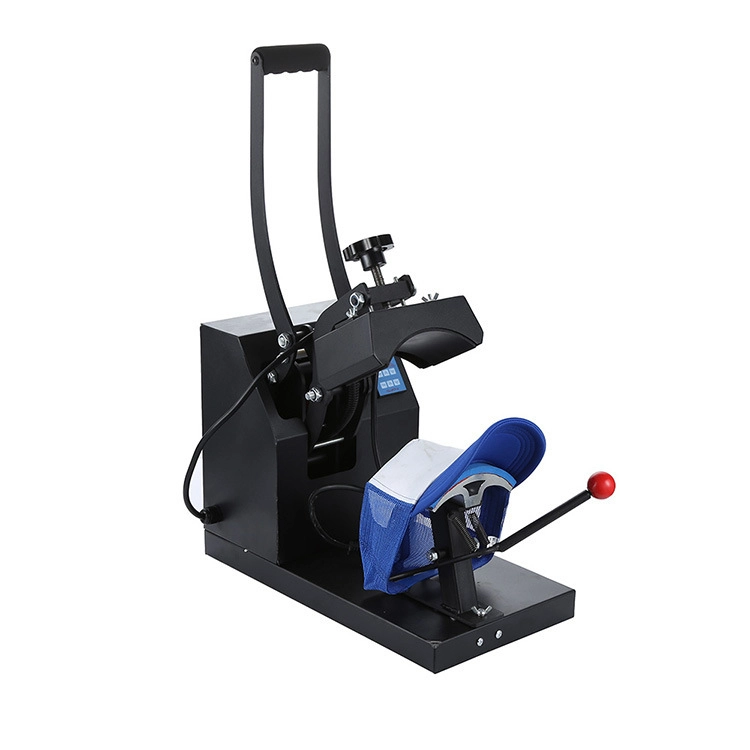
The Heart of the Operation: The Heat Press Machine
At the center of this entire endeavor lies the heat press machine. While it may be tempting for a novice to consider using a household iron or a standard flat press, such an approach is fraught with difficulty. The fundamental challenge of pressing a hat is its pronounced curvature. A flat surface simply cannot make even contact with a curved one, leading to a frustrating scenario where the center of your design might receive adequate heat and pressure, while the edges receive almost none. This results in poor adhesion, an unprofessional finish, and a design that will likely peel after a single wear.
To properly engage with this craft, one must turn to a machine designed for the task. The choice generally lies between two categories: a dedicated hat heat press machine or a multifunctional combo heat press machine that includes a hat attachment.
A dedicated hat heat press machine is, as the name suggests, built for one purpose. Its primary advantage is its specialized design. It features a curved upper heating platen and a corresponding curved lower platen (or buck). This design mirrors the natural shape of a cap, ensuring that consistent and even pressure is applied across the entire surface of the transfer. For anyone planning to produce hats in any significant quantity, or for those who demand the highest professional standards, this is unequivocally the superior choice. These machines are often more robust and offer more precise control over pressure, which is a critical variable when dealing with the structured front panels of many popular hat styles.
On the other hand, a combo heat press machine offers versatility. These are often sold as "5-in-1" or "8-in-1" units and come with interchangeable platens for pressing not only flat items like T-shirts but also mugs, plates, and, of course, hats. For a small business or a hobbyist exploring various avenues of product customization, the economic appeal of a single machine that can do many things is undeniable. The hat press attachment on a combo machine functions similarly to a dedicated press, with a curved platen. However, the overall pressure mechanism and frame might not be as specialized, and swapping between attachments can add time to your workflow. Think of it as the difference between a specialized chef's knife for filleting fish and a multi-tool with a knife blade; both can cut, but one is designed for excellence in a specific domain.
| Feature | Dedicated Hat Heat Press | Combo Heat Press (Hat Attachment) |
|---|---|---|
| Primary Function | Exclusively for hats and caps. | Multi-purpose (T-shirts, mugs, plates, etc.). |
| Performance | Optimized for even pressure on curves. | Good, but may be less precise than a dedicated unit. |
| Workflow | Always ready for hat pressing. | Requires swapping platens, adding setup time. |
| Cost | Moderate to high, for a single function. | Economical for multiple functions. |
| Ideal User | Businesses focused on headwear. | Hobbyists or businesses needing versatility. |
The Canvas: Selecting the Right Hat
The hat itself is far from a passive component in this process. Its material composition and structure will dictate your heat press settings and influence the final look and feel of the design.
The most common materials you will encounter are cotton, polyester, and various blends. Cotton-front hats, like classic "dad hats," are absorbent and can handle higher temperatures, making them very forgiving for beginners working with standard heat transfer vinyl (HTV). Polyester hats, often found in athletic or performance wear, require lower temperatures and shorter pressing times to avoid scorching or melting the synthetic fibers. A tell-tale sign of scorching on polyester is a permanent shiny mark left by the heat platen.
Trucker hats present a unique combination: a foam front panel with a mesh back. The foam front is an excellent surface for heat pressing. It is smooth and receptive to various transfers, including full-color sublimation, which is only possible on polyester or polymer-coated surfaces. The foam can, however, be susceptible to melting or permanent indentation if the temperature is too high or the pressure is too firm.
The structure of the hat also plays a critical role. A "structured" cap has a stiff buckram lining behind the front two panels, which helps it hold its shape. This structure provides a firm, stable surface to press against, which is generally easier for beginners. An "unstructured" cap lacks this reinforcement and is softer and more pliable. While comfortable to wear, pressing on an unstructured hat can be more challenging as the fabric is prone to shifting and wrinkling under the press. Securing it properly on the lower platen becomes even more important.
The Design Medium: Understanding Heat Transfer Materials
The substance of your design, the transfer itself, comes in several forms, each with its own properties, application process, and aesthetic outcome.
Heat Transfer Vinyl (HTV) is often the starting point for many decorators. It is a polymer-based material that comes on a clear carrier sheet. You cut your design from the vinyl (in reverse), remove the excess material in a process called "weeding," and then press it onto the garment. The heat and pressure from the press activate the adhesive on the back of the vinyl, bonding it to the fabric. HTV is available in a staggering array of finishes:
- Standard HTV: The workhorse for single-color designs.
- Stretch HTV: Ideal for flexible fabrics, it moves with the garment to prevent cracking.
- Glitter, Metallic, Holographic HTV: Adds a dynamic visual effect.
- Flock HTV: Has a soft, fuzzy, suede-like texture.
- Puff HTV: A fascinating material that expands when heated, creating a three-dimensional, "puffy" effect.
Direct-to-Film (DTF) Transfers represent a newer and highly versatile technology. With DTF, your design is digitally printed onto a special film using a dedicated printer. An adhesive powder is applied to the back of the wet ink, which is then cured. The resulting transfer can be applied to a wide variety of fabrics (cotton, polyester, blends) of any color. The main advantages of DTF are the ability to produce vibrant, full-color designs (including gradients and photorealistic images) with no weeding required. For complex, multi-color logos, DTF is often more efficient than layering multiple colors of HTV.
Sublimation is a scientific process rather than just an application. It uses special inks that, when heated, turn into a gas and permeate the polyester fibers of the fabric. The ink becomes a part of the material itself, rather than sitting on top like HTV or DTF. This results in a transfer with zero feel (you can't feel it with your hand) and unmatched durability—it will not crack, peel, or fade. The significant limitation of sublimation is that it only works on high-content polyester fabrics (or polymer-coated hard goods) and the fabric must be white or very light-colored, as the ink is transparent.
| Transfer Type | Best For | Pros | Cons |
|---|---|---|---|
| Heat Transfer Vinyl (HTV) | Simple, bold, single-color or layered designs. | Wide variety of finishes; readily available. | Weeding can be time-consuming; can feel thick. |
| Direct-to-Film (DTF) | Complex, full-color, or photorealistic designs. | No weeding; works on all fabric types/colors. | Requires specialized printer or ordering transfers. |
| Sublimation | Full-color designs on light polyester hats. | Zero feel; permanent and highly durable. | Only works on polyester; fabric must be light-colored. |
Ancillary but Necessary Tools
Beyond the main components, a collection of smaller tools is essential for a professional and frustration-free process.
- Cutting Machine: For anyone working with HTV, a digital cutter (from brands like Silhouette or Cricut) is non-negotiable for creating precise, intricate designs.
- Weeding Tools: A set of sharp, pointed tools, resembling dental picks, is necessary for the delicate task of removing the negative space from your cut HTV design.
- Heat-Resistant Tape: This is your best friend when pressing hats. A few small pieces of this special tape will hold your transfer perfectly in place on the curved surface, preventing it from shifting as you close the press.
- Protective Cover Sheet: A sheet of Teflon or even simple parchment paper should always be placed between the upper heat platen and your transfer. This serves two purposes: it protects your hat from direct contact with the hot metal surface, preventing scorching, and it protects your heat platen from any stray adhesive or ink.
- Design Software: Whether it's a professional suite like Adobe Illustrator or a more user-friendly program like Canva, you will need software to create, size, and prepare your digital design file for cutting or printing.
Step 2: The Genesis and Preparation of Your Design
The journey from a mere idea to a tangible design ready for application is a critical phase governed by both aesthetic judgment and technical foresight. A beautiful design that is improperly sized or prepared for the unique topography of a hat is destined for failure. This stage is about translating your creative vision into a practical, press-ready format, a process that demands careful measurement, software proficiency, and a hands-on understanding of your chosen transfer material. It is here that you truly begin to learn how to heat press on a hat by anticipating and solving problems before the heat is ever applied.
Conceptualizing Your Design for a Curved World
A hat is not a flat T-shirt. This seemingly obvious statement holds the key to successful hat design. The front face of a typical baseball cap is not only curved horizontally but often has a vertical curve as well. Furthermore, it is interrupted by a central seam on a 6-panel hat. These physical characteristics must inform your design choices.
Sizing and Placement: There is no single "correct" size for a hat design, but there are established conventions that provide a good starting point. For the front of a standard baseball cap, a design is typically between 2.25 inches and 2.75 inches (5.7 cm to 7 cm) tall. The width will vary based on the design's aspect ratio, but it's wise to keep it within 4.5 inches (11.4 cm) to avoid wrapping too far around the curve where it becomes distorted. For designs on the side of a hat, a smaller footprint of around 1.5 inches to 2.5 inches (3.8 cm to 6.3 cm) is common. Back-of-hat designs, often placed over the arch of the closure, are usually text-based and kept under 1 inch (2.5 cm) in height.
Adapting for the Curve: Simple, bold designs often translate better to a curved surface than extremely detailed or text-heavy ones. Very thin lines or tiny text can get lost or appear distorted as the hat curves away from the viewer's direct line of sight. When creating your design, it can be helpful to apply a slight "arc" or "warp" effect in your software to the bottom edge of your design. A subtle upward curve can counteract the downward droop that can occur visually when a flat design is placed on a convex surface. This is an advanced technique, but one that demonstrates a sophisticated understanding of the medium.
Software and File Preparation: Your choice of design software will depend on your skill level and the complexity of your project. Professional graphic designers will use vector-based programs like Adobe Illustrator or CorelDRAW. Vector graphics are created using mathematical equations, which means they can be scaled to any size without losing quality—a huge advantage when you might want to use the same logo on a hat and a large banner. For those new to design, web-based platforms like Canva or Kittl offer user-friendly interfaces and pre-made templates that can be easily customized.
Regardless of the software, the file preparation follows a set of rules. For HTV, your final design must be mirrored (flipped horizontally) before you send it to the cutter. This is because you are cutting the material from the back. When you flip the cut vinyl over to press it, the design will be correctly oriented. Forgetting to mirror is a classic rite of passage for every beginner, resulting in a perfectly cut, perfectly useless, backward design.
The Meticulous Craft of Cutting and Weeding
Once your design is finalized and mirrored, the next step is bringing it into the physical world.
Cutting Your Transfer: If you are using a heat transfer machine to apply HTV, you will first need a digital cutting machine. Before committing your full sheet of vinyl, always perform a "test cut." This is a small, simple shape (like a square or circle) cut in the corner of the material. The test cut allows you to verify that your machine's settings—blade depth, force, and speed—are correct for that specific material. The goal is to cut cleanly through the vinyl layer without piercing the clear plastic carrier sheet. An ideal cut will allow you to weed the test shape easily while the carrier sheet remains intact.
The Art of Weeding: Weeding is the process of removing all the vinyl that is not part of your design. For simple shapes and bold text, this is a quick and satisfying task. For intricate, complex designs, it can be a meditative, sometimes painstaking, process requiring patience, good lighting, and the right tools. The primary tool is a weeding hook, which allows you to pick up a corner of the unwanted vinyl and peel it away. A useful technique for complex designs is "box weeding," where you use a craft knife to cut lines through the excess vinyl around your design, breaking it up into smaller, more manageable sections to remove. Another pro-tip is to slightly warm the vinyl before weeding. Placing the sheet on the lower platen of your heat press (while it's off but still warm from a previous use) for a few seconds can soften the adhesive, making the vinyl easier to peel away from the carrier sheet.
For those using DTF transfers, this entire cutting and weeding process is blissfully bypassed. Your design arrives from the printer on its film, fully weeded and ready to be cut out with a simple pair of scissors. This is the primary reason why DTF is gaining so much popularity for businesses that value speed and efficiency, especially when dealing with intricate, full-color orders.
Step 3: Precision Calibration of Your Heat Press for Headwear
The heat press is not a blunt instrument; it is a tool of precision. The successful fusion of a transfer to a hat is a chemical and physical reaction that depends on a delicate balance of three interconnected variables: temperature, time, and pressure. I like to call this the "Golden Triangle" of heat pressing. Getting these settings right is arguably the most important technical skill in learning how to heat press on a hat. An incorrect setting in any one of these areas can lead to a host of problems, from a design that peels off to a permanently damaged hat. The calibration process is about moving from guesswork to a deliberate, scientific method.
The Golden Triangle: Time, Temperature, and Pressure
Imagine you are baking a cake. If the oven is too hot, the outside burns before the inside is cooked. If you don't bake it long enough, it will be a gooey mess. If you slam the oven door (the "pressure"), it might collapse. Heat pressing operates on a similar principle.
- Temperature: This is the energy that activates the adhesive on the back of your HTV or DTF transfer, or that turns your sublimation ink into a gas.
- Time: This is the duration for which that energy is applied. It must be long enough for the reaction to complete but not so long that it damages the materials.
- Pressure: This is the physical force that ensures intimate contact between the transfer and the fabric fibers, allowing the adhesive to properly bond or the sublimation gas to infuse.
These three elements are not independent. For example, some materials might allow for a slightly lower temperature if the pressing time is increased. However, the best practice, especially for beginners, is to treat the manufacturer's recommendations as your authoritative guide. The company that created the heat transfer material has invested significant research into finding the optimal combination of these three variables for their specific product. Deviating from their instructions should only be done for specific, advanced troubleshooting purposes.
Setting the Temperature: Finding the Sweet Spot
Your first action upon receiving any new type of heat transfer material should be to find its technical data sheet. This is usually available on the supplier's website. This sheet will specify the recommended temperature range. For example, a standard HTV for cotton might recommend 305-320°F (150-160°C), while a transfer for heat-sensitive polyester might require a lower setting of 270-280°F (132-138°C).
When you turn on your hat heat press machine, you will use its digital controller to set the target temperature. It is crucial to allow the machine to pre-heat fully. The display might show that it has reached the target temperature, but the metal platen itself, a large thermal mass, may take a few more minutes to stabilize at that temperature evenly across its entire surface. A good habit is to let the press sit at temperature for 5-10 minutes before your first press of the day. Some advanced presses have features to show both the set temperature and the actual real-time temperature, which can be very insightful.
Adjusting the Pressure: The Most Misunderstood Variable
Pressure is often the most abstract and difficult setting for newcomers to master. Unlike time and temperature, which have precise numerical values, pressure is often described in qualitative terms: light, medium, or firm.
What do these terms mean in the context of a hat press?
- Light Pressure: The upper platen just rests on the hat with minimal force.
- Medium Pressure: The press closes with a comfortable amount of resistance. You should feel you are clamping it down, but not straining. This is the most common setting for many HTV types.
- Firm Pressure: You need to use significant force with both hands to lock the press down. This is often required for thicker materials or for specific transfers like screen-printed transfers.
On a manual hat press, pressure is adjusted by turning a knob, usually located on top of the press or at the back. Turning it clockwise typically increases pressure, while counter-clockwise decreases it. The only way to get a feel for this is through practice. With the press cold and a hat loaded, practice clamping and unclamping the press, adjusting the knob until you can feel the difference between light, medium, and firm pressure.
The hat's structure complicates things. A structured hat with its stiff buckram provides something solid to press against. An unstructured hat will compress more, requiring you to adjust the pressure setting to achieve the same effective force on the fabric. Always test your pressure with the exact type of hat you plan to press.
Setting the Timer: A Matter of Seconds
The timer function on your digital controller is straightforward but no less important. As with temperature, you should adhere to the manufacturer's recommended time for your transfer material. Pressing times for hats are generally in the range of 10 to 20 seconds.
Over-pressing (too much time) can be as damaging as under-pressing. For HTV, excessive time can "cook" the adhesive, causing it to fail. It can also cause the vinyl to melt into the fabric excessively, losing its desired finish. For puff vinyl, over-pressing can actually flatten the puff effect. For sublimation, too much time can cause the image to look blurry as the gas spreads too far (an effect known as "ghosting").
Always begin your journey into how to heat press on a hat by creating a reference chart. List the different types of transfer materials you own and the corresponding recommended time, temperature, and pressure for each. Keep this chart near your press until the settings become second nature.
Step 4: Mastering the Art of Securing the Hat
We now arrive at what is arguably the most mechanically challenging and physically decisive step in the entire process: correctly loading and securing the hat onto the press. All the careful design preparation and precise calibration will be for naught if the hat is loose, wrinkled, or improperly aligned on the machine. The goal here is to create a pressing surface that is as smooth, taut, and stable as possible, transforming the awkward, curved object into a receptive canvas. This is a skill that requires practice and a feel for the equipment, moving beyond mere instruction to an intuitive understanding of the mechanics.
The Inherent Challenge of the Curve
Let us pause and consider the geometry of the problem. You are attempting to apply a flat, two-dimensional object (your transfer) onto a three-dimensional, convex surface (the hat). Any slack, wrinkles, or movement in the fabric during the press will result in a flawed application. The transfer might adhere to a wrinkle, creating a permanent crease in the design. Or, the fabric might shift as the press closes, causing the transfer to be applied askew or with "ghosted" or blurred edges.
The design of a dedicated cap press machine is intended to mitigate these issues. The curved lower platen provides support, while a tensioning mechanism is used to stretch the hat's front panel tightly across it. Mastering this mechanism is the key to this step.
Loading the Hat: A Step-by-Step Guide
This process can feel awkward at first, like trying to gift-wrap a basketball. But with practice, it becomes a swift and fluid motion.
-
Prepare the Hat: Start by unfastening the closure at the back of the hat (e.g., the plastic snap or Velcro strap). This gives you more material to work with. Next, reach inside the hat and flip the sweatband out. The sweatband is the fabric ring that goes against the forehead. Flipping it down and out of the way is crucial because it prevents the thick seam of the sweatband from creating an uneven surface under your pressing area.
-
Position on the Platen: Hold the hat by its bill and the back. Slide the front panel of the hat over the curved lower platen of your hat press. You want the bill of the hat to be pointing down and tucked securely underneath the platen.
-
Engage the Tensioner: This is the critical moment. Most hat presses have a tensioning lever or a clip at the back of the lower platen. While holding the hat in place with one hand, use the other to pull the back of the hat taut and secure it with this mechanism. The goal is to stretch the front panel of the hat so that it is perfectly smooth against the curve of the platen. There should be no visible wrinkles or loose areas in the spot where you intend to place your design. Run your hand over the surface; it should feel firm and drum-tight. If it feels loose, release the tensioner, pull the hat tighter, and secure it again.
The Pre-Press: An Indispensable Rehearsal
Once the hat is securely loaded, it is tempting to move straight to applying the design. This is a mistake. You must perform a "pre-press."
A pre-press involves closing the heat press onto the empty hat for a brief period, typically 3 to 5 seconds, at the target temperature. This simple action accomplishes two vital things:
-
Moisture Removal: All fabrics, especially natural fibers like cotton, hold a certain amount of ambient moisture from the air. When you apply intense heat, this moisture turns to steam. If you press your transfer onto a moist hat, the steam can interfere with the adhesive, leading to poor bonding. The steam gets trapped under the transfer and can create bubbles or prevent a solid connection with the fabric fibers. A pre-press vaporizes this moisture, leaving a dry surface that is perfectly prepared for the transfer.
-
Wrinkle Removal: Even on a well-secured hat, there may be tiny, invisible wrinkles or creases in the fabric. The heat and pressure of the pre-press will flatten these out, creating the smoothest possible canvas for your design.
Think of the pre-press as the final preparation of your canvas. It is a non-negotiable step for achieving a professional, durable finish. Skipping it is one of the most common and easily avoidable beginner errors. After the pre-press, the hat's surface will be hot, which can actually help with the initial placement of your transfer in the next step.
Step 5: The Climactic Moment of Application
With the hat pre-pressed and waiting expectantly on the platen, we reach the focal point of the procedure. This is the moment where design meets garment, where potential becomes reality. While the actual pressing action is brief, the preparatory steps of placement and securing the transfer are deliberate and demand a steady hand. Precision here is paramount; a design that is off-center by even a quarter of an inch can throw off the entire aesthetic of the finished piece. This stage is about bringing together all the previous elements—the calibrated machine, the prepared design, and the secured hat—into a single, decisive action.
Precision Placement: Finding the Center
The hot surface of the pre-pressed hat offers a slight advantage: the carrier sheet of your transfer will become slightly tacky upon contact, helping it stay in place as you make fine adjustments. But how do you find the perfect location?
For structured, 6-panel hats, the center seam running down the front is your most reliable guide. You can find the visual center of your transfer (you can even lightly fold it in half while it's still on the carrier sheet to make a small crease mark at the top and bottom) and align this with the hat's seam.
For unstructured hats or 5-panel hats (which have a single, seamless front panel), finding the center requires a more visual approach. Eyeballing it can work with practice, but for consistent results, a simple trick is to use the bill of the hat as a reference. The center of the bill's curve is a good indicator of the hat's overall center line.
Another consideration is vertical placement. You generally want to avoid placing the design too high, where it might get distorted by the top curve of the hat, or too low, where it touches the bill. A good rule of thumb is to leave about half an inch (or one finger's width) of space between the bottom of your design and the top of the bill's seam.
Taping It Down: Your Insurance Against Shifting
Once you are satisfied with the placement, do not proceed without securing the transfer. The mechanical action of closing a heat press, even a high-quality one, can create a small puff of air or slight vibration that is more than enough to shift a loose transfer.
This is where heat-resistant tape becomes indispensable. This special tape is designed to withstand the high temperatures of the press without melting or leaving a residue. Use two to four small pieces to tape the edges of your transfer's carrier sheet directly to the hat. Place the tape on the clear carrier sheet, not on the vinyl itself. This simple action acts as an insurance policy, locking your design in its exact position and guaranteeing a crisp, sharp application free from the dreaded "ghosting" effect.
The Pressing Process: A Moment of Controlled Force
Everything is now in place for the final action.
-
Place the Protective Sheet: Before closing the press, lay your protective cover sheet (Teflon or parchment paper) over the entire design area. This is a non-negotiable step. It shields the hat from direct contact with the hot metal platen, preventing scorching, and also protects the platen from any potential residue from the transfer.
-
Close the Press: With both hands, bring the upper platen down and lock it into place. The motion should be smooth and deliberate. On a clamshell press, it closes like a mouth. On a swing-away press, you will swing the heating element over the hat and then lower it vertically. Once closed and locked, the timer on your machine should begin counting down automatically.
-
Wait and Release: This is the simplest part. Let the heat transfer machine do its work for the prescribed amount of time. The machine will typically beep to signal that the cycle is complete. Open the press with the same smooth, deliberate motion you used to close it. For auto-open presses, the machine will pop open on its own, which is a great feature for preventing over-pressing if you get distracted.
With the press open, your hat now bears the applied transfer, enveloped in the heat and promise of the design within. The next step, the reveal, is just moments away.
Step 6: The Unveiling—Peeling and Finalizing the Press
The sound of the heat press beeping signals the end of one phase and the beginning of another equally critical one: the reveal. This is the moment of truth where you discover if your careful preparation has paid off. However, the process is not as simple as just ripping the carrier sheet off. The method and timing of this "peel" are dictated by the specific chemistry of the heat transfer material you are using. Rushing this step or using the wrong technique can ruin a perfectly pressed design. Furthermore, an optional final press can be the secret to elevating your work from good to exceptional, adding a professional finish and enhanced durability.
The Critical Distinction: Hot Peel vs. Cold Peel
Heat transfer materials are generally categorized as either "hot peel" or "cold peel." This refers to the temperature at which the carrier sheet should be removed after pressing. This is not a matter of preference; it is a strict instruction from the manufacturer based on the formulation of the adhesive.
Hot Peel (or Warm Peel): For a hot peel material, you must remove the carrier sheet almost immediately after the press opens, while the hat and the transfer are still very hot. The adhesive is designed to bond to the fabric and release from the carrier sheet at high temperatures. Waiting for it to cool can cause the adhesive to re-bond to the carrier, potentially pulling the vinyl up with it when you try to peel.
To perform a hot peel, open the press and, with a confident and fluid motion, peel back the carrier sheet. Be mindful that the surface is hot. Start at a corner and peel diagonally across the design at a low angle.
Cold Peel: For a cold peel material, the opposite is true. You must wait for the hat and transfer to cool down completely before attempting to remove the carrier sheet. This can take anywhere from 30 seconds to a few minutes. You can speed up the process by removing the hat from the press and waving it in the air or placing it on a cool surface. The adhesive on a cold peel vinyl is designed to finalize its bond with the fabric as it cools. Attempting to peel it while it's still hot will almost certainly result in the design lifting off the hat, creating a frustrating mess.
Once cool to the touch, the peeling process is the same: start at a corner and peel the carrier sheet back at a low, smooth angle.
How do you know which type you have? Always check the product specifications from your supplier. If you are ever unsure, the safest bet is to assume it is a cold peel. You can always try to peel a small corner when it's cool; if it doesn't lift easily, you can place it back on the press for a few seconds to reheat it and then try a warm peel.
The Professional's Secret: The Second Press
After you have successfully peeled away the carrier sheet, your design is on the hat. For many, this is the final step. However, to achieve a truly professional, long-lasting result, I strongly advocate for a final, second press.
This involves placing the hat, now with the exposed design, back under the press. Make sure to cover it again with your Teflon or parchment paper protective sheet. Press the hat for a very short duration, typically just 2 to 5 seconds, using the same temperature and pressure as before.
This second press accomplishes two things:
- Enhances Durability: It helps to further melt the adhesive and embed the design into the fibers of the hat. This creates a stronger, more permanent bond that will hold up better to wear and washing.
- Improves Finish: For many types of HTV, this final press can remove the slightly shiny finish left by the plastic carrier sheet, giving the design a more matte, screen-printed look that integrates more naturally with the fabric's texture. You can often see the weave of the fabric through the vinyl after a second press, which is a hallmark of a high-quality application.
This quick, simple step is one of the key differentiators between amateur and professional-grade work.
Inspecting Your Masterpiece
Now is the time for a final, close inspection. Look at the design from all angles. Check the edges to ensure there is no lifting or peeling. The entire design should be firmly adhered to the hat. Run your fingers over it (once it's cool). It should feel secure. If you used puff vinyl, check that it has risen evenly. If you used glitter vinyl, admire how it catches the light. This tactile and visual confirmation is the satisfying culmination of the entire process of how to heat press on a hat.
Step 7: A Scholarly Approach to Troubleshooting Common Hat Pressing Flaws
In any craft that involves a complex interplay of variables, imperfections are not just possible; they are inevitable, especially during the learning process. The path to mastery is paved with these small failures. The key is to approach them not with frustration, but with a diagnostic mindset. Each flawed hat is a piece of data, offering clues to what went wrong in the process. By systematically analyzing the issue and understanding its root cause, you can make precise adjustments to your technique. This section provides a framework for troubleshooting the most common problems encountered when learning how to heat press on a hat.
Flaw 1: The Dreaded Crease Mark from the Platen
The Symptom: After pressing, you notice a distinct, often permanent, indented line on the hat that perfectly matches the edge of your upper heat platen.
The Diagnosis: This is almost always a problem of excessive pressure or an improper fit on the lower platen. The hard edge of the heating element has been forced into the fabric with too much force, crushing the fibers (especially on foam-front trucker hats) or the hat's internal buckram structure.
The Prescription:
- Reduce Pressure: This is the first and most obvious solution. Adjust your pressure knob to a lighter setting. You need enough pressure for the transfer to adhere, but not so much that you are deforming the hat itself. Medium pressure is a safe starting point for most applications.
- Use a Heat Press Pillow or Pad: For persistent issues, a small, firm pillow made of heat-resistant foam can be a lifesaver. You can place a small pad inside the hat, directly behind the pressing area. This helps to absorb and distribute the pressure more evenly, softening the hard edge of the platen.
- Ensure a Taut Fit: Revisit your technique for securing the hat. If the hat is not stretched tightly over the lower platen, there can be a "ridge" of fabric that catches the edge of the upper platen, exacerbating the problem.
Flaw 2: The Vinyl is Peeling, Lifting, or Not Sticking
The Symptom: During or after the peel, you notice that parts of the design are not adhered to the hat and are lifting off.
The Diagnosis: This is the most common issue and can have several causes, all related to a failure in the adhesion process.
The Prescription:
- Verify Your Settings: The "Golden Triangle" is the prime suspect. Double-check the manufacturer's recommended temperature, time, and pressure for your specific material. Was the press fully pre-heated? Was the pressure firm enough?
- Check Your Peel: Are you using the correct peel method? Trying to cold-peel a hot-peel vinyl is a guaranteed way to cause lifting.
- Perform a Pre-Press: Did you skip the pre-press? Trapped moisture is a notorious culprit for adhesive failure.
- Consider the Fabric: Some hats come with a waterproof or stain-resistant coating. These chemical coatings can act as a barrier, preventing the transfer's adhesive from bonding with the fabric fibers. If you suspect this, you can try wiping the application area with a small amount of rubbing alcohol before the pre-press (ensure it is fully evaporated) to help remove the coating.
- Attempt a Re-Press: If the design lifts, do not panic. Carefully lay the carrier sheet back down, cover with your protective sheet, and press it again. You might try increasing the pressure slightly or adding a few seconds to the time.
Flaw 3: A Scorched Hat or Melted Transfer
The Symptom: The area around your design has a shiny, discolored appearance (on polyester) or the hat material itself looks burnt. Alternatively, the vinyl transfer looks melted, bubbly, or distorted.
The Diagnosis: This is a clear case of excessive heat. Either the temperature was set too high for the material, or the pressing time was too long.
The Prescription:
- Lower the Temperature: The most direct solution. Consult the material's data sheet and adjust your press accordingly. Always err on the side of caution with synthetic fabrics like polyester or nylon.
- Reduce the Time: Shorten your pressing duration. Even at the correct temperature, too much time can cause scorching.
- Always Use a Protective Sheet: This should be standard practice, but it is especially important for preventing scorching. A Teflon sheet provides a thermal buffer that can help mitigate minor temperature inaccuracies.
- Test, Test, Test: Before pressing on your final, expensive hat, always do a test press on a scrap piece of similar fabric or an old, unwanted hat. This allows you to confirm your settings without risking your project.
Flaw 4: Ghosting or Blurred Edges on the Design
The Symptom: The edges of your design look fuzzy, or there appears to be a faint, shadowy second impression of the image slightly offset from the main one.
The Diagnosis: This flaw, known as "ghosting," is caused by the transfer shifting on the garment at some point during the pressing process. This can happen when the press is being closed, when it's being opened, or for sublimation, if the paper shifts while the ink is in its gaseous state.
The Prescription:
- Use Heat-Resistant Tape: This is the number one defense against ghosting. As detailed in Step 5, securely taping down the edges of your carrier sheet locks the transfer in place.
- Ensure Smooth Press Operation: Open and close your heat press with a smooth, vertical motion. Avoid letting the platen slide or scrape across the hat as it makes contact or releases.
- Check Platen Alignment: On some lower-quality presses, the platens may not be perfectly aligned, causing a slight sideways shift upon closing. Ensure your machine is on a stable, level surface and that the mechanics are functioning properly.
By approaching these common flaws with a spirit of inquiry, you transform setbacks into learning opportunities, steadily refining your skill and deepening your understanding of the intricate dance between heat, pressure, time, and materials.
Frequently Asked Questions
Can I use a regular flat heat press or an iron for hats? While it is technically possible with a great deal of difficulty, it is highly discouraged. A flat press or an iron cannot provide the even heat and pressure required to properly adhere a transfer to a hat's curved surface. This often results in peeling edges, incomplete transfers, and an unprofessional finish. A dedicated hat press with a curved platen is the proper tool for consistent, high-quality results.
What are the best types of hats to use for heat pressing? Hats with a high cotton or polyester content work best. For beginners, structured 6-panel hats with a cotton or poly-twill front are often easiest, as the firm front panel provides a stable surface. Foam-front trucker hats are also excellent, especially for full-color sublimation transfers. Avoid hats with complex textures, heavy ribbing, or coatings that might interfere with adhesion.
How do I prevent the front panel of the hat from collapsing or creasing? The key is to stretch the hat's front panel as tightly and smoothly as possible over the lower platen of your hat press using the machine's tensioning mechanism. Performing a 3-5 second pre-press also helps to flatten the surface. For unstructured hats, using a firm, heat-resistant foam insert or a specialized hat-stretching tool inside the cap can provide the necessary internal support.
What is the difference between a hat press and a mug press machine? Both are specialized heat presses, but they are designed for different shapes. A hat heat press machine has a curved platen shaped like the front of a cap. A mug press machine has a cylindrical heating element that wraps around a mug or tumbler. While both are often included in a combo heat press machine, their attachments are not interchangeable; you cannot use a mug press for a hat or vice versa.
How should I care for and wash a heat-pressed hat? To ensure the longevity of the design, it's best to wait at least 24-48 hours after pressing before the first wash. Hand washing in cold water with a mild detergent is the gentlest and most recommended method. Avoid harsh scrubbing on the design. If machine washing is necessary, use a cold, gentle cycle and place the hat in a protective laundry bag. Always air dry the hat; never put it in a machine dryer, as the high heat can damage or melt the transfer.
Why is my puff vinyl not "puffing" up? This is a common issue with a few potential causes. First, check the manufacturer's instructions, as some puff vinyl requires a second press after a hot peel to activate the puff effect. Second, ensure you are not using overly firm pressure; too much pressure can flatten the vinyl and prevent it from rising. Lastly, the material may be old or have been stored improperly, affecting its chemical properties. Always test a small piece first.
Conclusion
The process of transforming a simple hat into a piece of custom apparel is a rewarding endeavor that beautifully marries technology and artistry. As we have seen, learning how to heat press on a hat is far more than a single action; it is a sequence of deliberate, interconnected steps, each demanding care and precision. From the initial selection of your materials and the thoughtful calibration of your heat press to the critical moments of application and the final, satisfying peel, every stage contributes to the quality and durability of the finished product.
The challenges presented by the hat's curved surface are not insurmountable obstacles but rather opportunities to develop a deeper, more tactile understanding of your craft. By embracing a diagnostic approach to troubleshooting and treating each imperfection as a lesson, you will quickly move beyond the frustrations of a beginner and into the confident workflow of a seasoned professional. The principles of time, temperature, and pressure, once mastered, become your trusted allies.
Whether your goal is to create unique gifts for friends, to launch a small business from your home, or to expand the offerings of an established apparel company, the skills detailed here provide a solid foundation for success. The hat press is more than just a piece of equipment; it is a gateway to a world of creative expression. With practice, patience, and a commitment to the details, you now possess the knowledge to produce custom headwear that is not only visually striking but also professionally finished and built to last.
References
Easty Limited. (2023, February 13). Cap heat press | Heat press machine Easty Star-Cap. Easty Ltd.
HeatPressLeader. (n.d.). HeatPressLeader cap heat press machine: The efficient choice. Retrieved January 15, 2025, from https://www.heatpressleader.com/heatpressleader-cap-heat-press-machine-the-efficient-choice.html
HeatPressNation. (n.d.). Heat press nation | Heat presses, DTF, sublimation & vinyl. Retrieved January 15, 2025, from
Shrestha, R., & R, P. K. (2020). A review on the study of heat transfer on textiles. International Journal of Engineering and Manufacturing Science, 10(1), 77-88.
Swing Design. (n.d.). 8-in-1 combo 15" best heat press bundles. Retrieved January 15, 2025, from https://www.swingdesign.com/collections/8-in-1-combo-heat-presses
Transfer Express. (2025, January 24). What heat press should you buy in 2025? [Video]. YouTube. https://www.youtube.com/watch?v=LiCfb2F1lWc
Walmart. (n.d.). 8 in 1 heat press machine, 12" x 15" combo digital multifunctional. Retrieved January 15, 2025, from