.png)
.png)

Your Practical 7-Step Checklist for Launching a Profitable Heat Press Business in 2025
September 25, 2025
Abstract
Launching a heat press business offers a potent avenue for creative entrepreneurship, particularly within dynamic markets such as South America, Southeast Asia, and the Middle East. This document provides a comprehensive framework for establishing a profitable enterprise centered around heat transfer technology. It methodically examines the entire process, from initial market research and niche identification to the technical selection of equipment like combo, hat, and mug presses. The guide addresses the formulation of a robust business plan, including financial forecasting and supply chain management. It further explores the practical aspects of setting up an efficient workflow, mastering various transfer techniques such as sublimation and heat transfer vinyl (HTV), and implementing effective marketing strategies. The objective is to equip aspiring entrepreneurs with the knowledge and strategic foresight needed to navigate the complexities of the custom decoration industry, ensuring a foundation for sustained growth and profitability in 2025 and beyond.
Key Takeaways
- Define your specific product niche before investing in any equipment.
- Develop a detailed business plan with clear financial projections.
- Select a heat press machine based on your niche and production volume.
- Master the precise time, temperature, and pressure for quality results.
- Start with a strong local marketing strategy to build a customer base.
- A versatile Combo Heat Press Machine can expand your initial product offerings.
- Focus on quality control to build a reputable heat press business.
Table of Contents
- Step 1: Foundational Research and Niche Identification
- Step 2: Crafting a Solid Business Plan
- Step 3: Selecting the Right Heat Press Equipment
- Step 4: Setting Up Your Workspace and Workflow
- Step 5: Mastering the Craft of Heat Transfer
- Step 6: Building Your Brand and Marketing Your Products
- Step 7: Scaling and Growing Your Heat Press Business
- Frequently Asked Questions (FAQ)
- Conclusion
- References
Step 1: Foundational Research and Niche Identification
Embarking on the path of a heat press business is not merely about acquiring a machine and pressing designs onto t-shirts. It begins with a much deeper, more contemplative process of inquiry. You must first become a student of your own community, your culture, and the subtle currents of commerce that flow through it. The most successful ventures are not born from technology alone but from a profound understanding of human desire and need. Before the first garment is pressed, the foundational work of research and reflection must be done. This initial stage is what separates a fleeting hobby from a sustainable enterprise. It requires you to look outward at the market and inward at your own interests and capabilities to find the unique intersection where your business can flourish.
Understanding Your Local Market
Your immediate environment is a rich tapestry of opportunities. Think about the specific needs and passions of people in your region, whether it is Rio de Janeiro, Moscow, Jakarta, Dubai, or Johannesburg. Each locale has its own rhythm, its own celebrations, and its own aesthetic sensibilities. A design that resonates deeply in one culture may be meaningless in another.
Begin by observing. Attend local markets, festivals, and community events. What are people wearing? What kinds of personalized items are being sold, if any? Pay attention to tourists. What souvenirs are they drawn to? Are they looking for generic trinkets, or would they appreciate something with a more authentic, local flavor?
Consider the economic landscape. Are there many small businesses, schools, or sports teams in your area? These organizations often require custom apparel for uniforms, events, and promotions. A heat press business can serve as a valuable local partner for them, offering faster turnaround times and more personalized service than a large, distant corporation. For instance, in many parts of Southeast Asia, local sports leagues are a significant part of community life, presenting a constant demand for custom jerseys. In the Middle East, there is a strong tradition of gift-giving during holidays, creating a market for high-end personalized items like decorative plates or custom-printed tote bags with elegant calligraphy.
Choosing a Profitable Niche
Once you have a sense of the broader market, the next task is to carve out a specific niche. Attempting to be everything to everyone is a common pitfall for new entrepreneurs. It spreads your resources too thin and makes your brand message unclear. Specialization, on the other hand, allows you to become an expert, refine your process, and target your marketing with precision.
Your niche could be product-based. You might decide to focus exclusively on:
- Apparel: T-shirts, hoodies, and baby onesies are classic choices.
- Athletic Wear: Custom jerseys for local sports teams using durable, breathable materials.
- Corporate Branding: Polo shirts, hats, and tote bags for company events and employee uniforms.
- Accessories: Mugs, phone cases, mousepads, and keychains. A dedicated mug press machine can be a cornerstone of this niche.
- Home Decor: Custom pillowcases, tea towels, and ceramic tiles.
Alternatively, your niche could be theme-based. You could become the go-to source for:
- Tourist Souvenirs: Designs that celebrate local landmarks, slang, and culture.
- Personalized Gifts: Items for weddings, birthdays, anniversaries, and holidays.
- Advocacy and Social Causes: Apparel that allows people to express their support for movements they care about.
- Niche Hobbies: T-shirts for local car clubs, gardening groups, or book lovers.
Choosing a niche is a balance between market demand and personal passion. If you are genuinely interested in the niche you choose, your enthusiasm will be evident in your work and your marketing, creating a more authentic connection with your customers.
Competitor Analysis
Studying your competitors is not about imitation; it is about education. Identify other individuals or businesses in your area offering similar services. Analyze their offerings, their pricing, and their presentation. What are they doing well? Perhaps their product photography is excellent, or they have a strong following on social media. These are areas from which you can learn.
More importantly, where are their weaknesses? Perhaps their designs are generic, their product quality is inconsistent, or their customer service is lacking. These gaps represent your opportunities. Your heat press business can succeed by filling these voids. For example, if local competitors focus only on bulk orders of cheap t-shirts, you could build a reputation for high-quality, artistic, single-item orders on premium garments. If others only offer simple text-based designs, you can stand out by offering intricate, full-color graphics using sublimation or Direct-to-Film (DTF) transfers. This careful analysis allows you to position your business not as just another option, but as the better option.
Step 2: Crafting a Solid Business Plan
An idea, no matter how brilliant, remains an abstraction until it is grounded in a concrete plan. A business plan is not a mere formality for securing a loan; it is the architectural blueprint for your enterprise. It forces you to move from vague aspirations to specific, actionable steps. It is a living document that will guide your decisions, help you measure your progress, and provide a framework for navigating the inevitable challenges of entrepreneurship. For a new heat press business, this plan translates your creative vision into a viable commercial operation, addressing the practical questions of structure, finance, and logistics.
Outlining Your Business Structure
The first structural decision you will face is the legal form of your business. The options will vary depending on your country's laws, but they generally include a few common types. A sole proprietorship is often the simplest to establish, making you and the business a single legal entity. This is a common starting point for many small ventures. However, a limited liability company (LLC) or a similar corporate structure creates a legal separation between your personal assets and your business debts. This separation provides a layer of protection that can be invaluable as your business grows.
Investigate the specific registration requirements in your city and country. What licenses or permits are needed to operate a small business from home or a commercial location? Are there specific tax obligations you need to be aware of? Addressing these bureaucratic hurdles at the outset prevents legal and financial complications later on. Think of this process as laying the proper foundation for a house. It may not be the most exciting part of the construction, but it is indispensable for the stability of the entire structure.
Financial Forecasting: Calculating Startup Costs and Pricing Strategy
Clarity about your finances is non-negotiable. You must develop a realistic budget that accounts for all your initial startup costs. Many new entrepreneurs underestimate these expenses, which can put a strain on the business before it even has a chance to generate revenue. Your forecast should be detailed and comprehensive.
Here is a sample breakdown of potential startup costs to consider:
| Expense Category | Estimated Cost (Low End) | Estimated Cost (High End) | Notes |
|---|---|---|---|
| Heat Press Machine | $300 USD | $2,000+ USD | A combo machine offers versatility; a high-end auto-press offers efficiency. |
| Computer & Software | $500 USD | $2,500 USD | For creating and managing designs (e.g., Adobe Illustrator, CorelDRAW, Affinity Designer). |
| Printer | $250 USD | $1,000+ USD | A sublimation printer or a DTF-converted inkjet printer will be needed. |
| Initial Supplies | $200 USD | $800 USD | Transfer paper, vinyl, ink, blank t-shirts, mugs, hats, etc. |
| Business Registration | $50 USD | $500 USD | Varies significantly by country and business type. |
| Website & Marketing | $100 USD | $600 USD | Domain, hosting, social media ads, sample product photography. |
| Workspace Setup | $100 USD | $400 USD | Sturdy table, storage shelves, proper ventilation. |
| Total Estimated Startup | $1,500 USD | $7,800+ USD | This is a broad range; your specific niche will determine the actual costs. |
Once you understand your costs, you can develop a pricing strategy. A common mistake is to compete solely on price. This often leads to a "race to the bottom" that erodes your profit margins and devalues your craft. Instead, your pricing should reflect the quality of your materials, the skill involved in your work, and the value you provide to the customer. Calculate your cost per item (including the blank product, transfer materials, and a small portion for your overheads) and then add a markup that ensures profitability.
Sourcing Your Supplies: Finding Reliable Suppliers
The quality of your finished product is directly tied to the quality of your raw materials. A beautiful design will fade and crack on a poor-quality t-shirt, and a premium garment can be ruined by inferior heat transfer vinyl. Sourcing reliable suppliers for your blank goods and transfer media is therefore a task of utmost significance.
When evaluating suppliers, consider three factors:
- Quality: Whenever possible, request samples before placing a large order. Feel the fabric of the t-shirts. Test how well the vinyl weeds and applies. Print a test mug and run it through the dishwasher multiple times. Your reputation depends on the durability of your products.
- Price: While quality is paramount, price remains a factor. Look for suppliers that offer wholesale pricing or bulk discounts. Balancing cost and quality is a key skill for a successful heat press business owner.
- Reliability: A supplier with inconsistent stock or slow shipping times can bring your production to a halt. Find partners who are communicative, have a good track record, and can reliably deliver the materials you need when you need them. Building strong relationships with a few trusted suppliers is more valuable than constantly hunting for the cheapest deal.
Step 3: Selecting the Right Heat Press Equipment
The heat press machine is the heart of your production. It is the tool that transforms a digital design and a blank substrate into a finished, sellable product. The choice of a machine is therefore one of the most consequential decisions you will make. It is not simply a matter of finding the cheapest option. The right machine for your heat press business depends on your chosen niche, your anticipated production volume, your workspace, and your budget. A thoughtful selection will empower your creativity and efficiency, while a poor choice can lead to frustration, wasted materials, and limited potential. Let us examine the different types of machines and the features that truly matter.
Clamshell vs. Swing-Away vs. Draw: A Comparative Analysis
Heat press machines primarily come in three main configurations, each with its own distinct mode of operation, advantages, and disadvantages. Understanding these differences is fundamental to making an informed choice.
-
Clamshell Press: This design operates like a mouth, with the top platen hinging at the back and closing directly down onto the bottom platen. Its primary advantage is its small footprint, making it ideal for businesses with limited space. It is also generally faster to operate, as the opening and closing action is quick and direct. However, the closing motion can make it slightly more difficult to precisely arrange your transfer and substrate, as the heating element comes down at a slight angle.
-
Swing-Away Press: In this design, the top platen swings away horizontally from the bottom platen. This provides a completely unobstructed view of the workspace, making it much easier to lay out your garment and transfer with precision. It also keeps the hot platen away from your hands, reducing the risk of burns. The main drawback is that it requires significantly more space to operate, as you need clearance for the top to swing out to the side.
-
Draw Press: This type offers a hybrid approach. The bottom platen pulls out toward the operator like a drawer. This gives you an open workspace for layout, similar to a swing-away, but without requiring the extra side-to-side clearance. It combines the safety and precision of a swing-away with a more compact footprint.
Here is a table to help visualize the comparison:
| Feature | Clamshell Press | Swing-Away Press | Draw Press |
|---|---|---|---|
| Workspace Footprint | Smallest | Largest | Medium |
| Layout Area | Obstructed | Fully Open | Fully Open |
| Ease of Layout | Moderate | Excellent | Excellent |
| Speed of Operation | Fastest | Slower | Moderate |
| Pressure Application | Can be slightly uneven | Very Even | Very Even |
| Best For | High-volume T-shirts, limited space | Precision work, thicker items | A balance of space and precision |
Think about the products you plan to make. If you are focusing on standard t-shirts in a small workshop, a clamshell might be perfectly adequate. If your work involves intricate multi-layer vinyl designs or pressing on thicker items like ceramic tiles, the precision and even pressure of a swing-away or draw press would be a significant advantage.
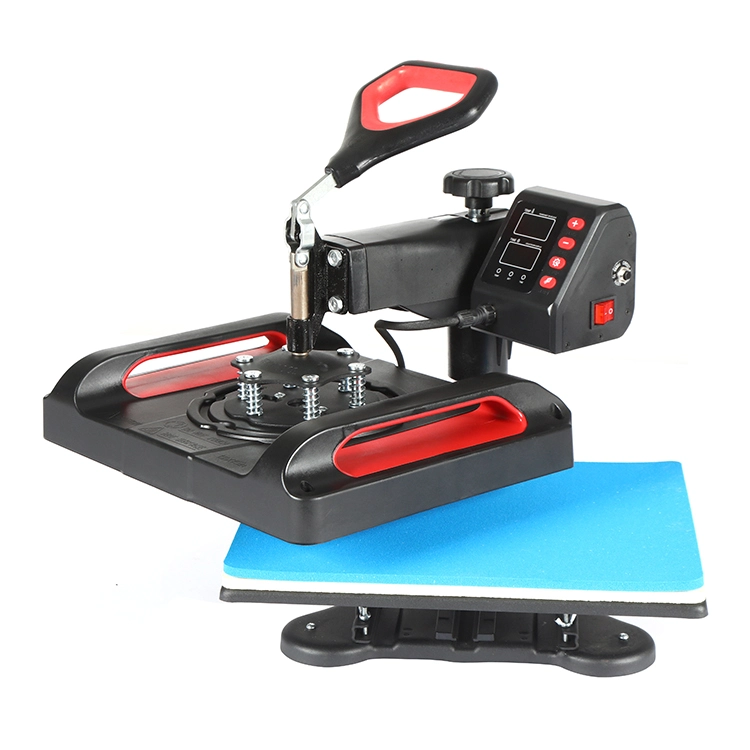
The Versatility of a Combination Heat Press Machine
For a new heat press business, especially one on a tight budget, a combination or "multifunction" heat press can be an exceptionally wise investment. These machines come with interchangeable attachments that allow a single base unit to press a wide variety of items. A typical combo package might include:
- A flat platen for t-shirts, tote bags, and other flat items.
- One or more mug attachments of different sizes.
- Plate attachments for ceramic plates.
- A curved attachment for hats and caps.
The primary benefit is economic. Purchasing a versatile heat transfer machine is far more cost-effective than buying separate, dedicated machines for each type of product. This allows you to offer a diverse product range from day one, enabling you to test the market and see which items are most popular with your customers. You can experiment with selling custom mugs, hats, and plates without committing to the expense and space required for three or four different machines. While a dedicated hat heat press machine might offer more specialized features for high-volume hat production, a combo unit provides an unparalleled entry point into a wider market.
Understanding Key Features: Size, Pressure, and Digital Controls
Beyond the basic type, several key features distinguish one machine from another.
- Platen Size: The size of the heating element, or platen, determines the maximum size of the transfer you can apply in a single press. A common starter size is 15"x15" (38x38cm), which is large enough for most adult t-shirt designs. Smaller, more portable presses are available, but they limit your design possibilities. Larger presses (e.g., 16"x20" or 40x50cm) are better for oversized garments or for pressing multiple small items at once, but they are more expensive and require more power.
- Pressure Adjustment: The ability to apply firm, even pressure is what separates a professional heat press from a household iron. Most machines have a manual pressure adjustment knob. High-end models may feature automatic or pneumatic pressure systems, which provide perfectly consistent results every time but come at a much higher cost.
- Digital Controls: Modern heat presses feature digital time and temperature controls. This is not a luxury; it is a necessity for consistent, professional results. Different transfer methods and substrates require very specific settings (Galaxy Press, 2025). Digital controls allow you to set the exact temperature and time needed for each job, ensuring your prints are neither under-cured and peeling nor over-cured and scorched.
Step 4: Setting Up Your Workspace and Workflow
A well-organized workspace is more than a matter of tidiness; it is a matter of safety, efficiency, and professionalism. The physical environment where you create your products has a direct impact on the quality of your work and your own well-being. A cluttered, poorly planned space can lead to mistakes, accidents, and slow production times. Conversely, a thoughtful layout can transform your process into a smooth, logical flow, allowing you to work comfortably and produce consistent results. This step involves moving from the abstract world of planning to the tangible reality of building your creative studio.
Designing an Ergonomic and Safe Workspace
Your first priority must be safety. A heat press machine is an industrial tool that operates at high temperatures.
- Ventilation: Some transfer processes, particularly sublimation and DTF, can release fumes. While generally low, it is always best to work in a well-ventilated area. An open window, a fan, or a dedicated fume extractor can help maintain good air quality.
- Electrical Supply: A heat press draws a significant amount of power. Ensure the electrical circuit you are using can handle the load. Avoid using long extension cords, which can overheat. Plug the machine directly into a suitable wall outlet.
- Stable Surface: The press must be placed on a sturdy, level table or workbench that can easily support its weight. An unstable surface is a serious hazard.
- Clearance: Keep the area around the press clear of flammable materials. Have a designated, heat-resistant spot (like a silicone pad) to place hot attachments, such as a mug press element, when you are swapping them out.
Beyond safety, consider ergonomics. You may be spending many hours in this space. Position your press at a comfortable working height to avoid straining your back. Arrange your supplies—blank garments, transfers, weeding tools, and heat-resistant tape—so they are within easy reach. A logical layout might flow from a design and prep area, to the heat press itself, to a cooling and folding area. This creates a production line, even if it is just on a single large table, which minimizes unnecessary movement and maximizes efficiency.
Mastering the Heat Transfer Process: A Step-by-Step Guide
While the specifics will vary based on the material and transfer type, a general workflow provides the foundation for all heat press projects. Mastering this sequence is key to achieving consistent quality.
- Preparation: Turn on your heat press and set it to the required temperature and time for your specific project. Refer to the instructions provided by your transfer material supplier. While the press is heating, prepare your substrate. If you are pressing a t-shirt, pre-press it for 3-5 seconds. This simple action removes moisture and wrinkles, creating a perfect, flat surface for the transfer (Allprintheads.com, 2024).
- Positioning: Carefully lay your garment or item on the lower platen. Then, place your transfer (e.g., HTV, sublimation paper) in the desired position. Use a T-square ruler or other alignment tools to ensure it is centered and straight. For sublimation or other transfers that do not have a sticky carrier sheet, use a few small pieces of heat-resistant tape to secure the design in place. This prevents it from shifting and causing a "ghosting" effect.
- Protection: Always place a protective sheet over your transfer and substrate. A sheet of Teflon, parchment paper, or butcher paper serves two purposes: it protects your garment from direct contact with the hot platen, preventing scorching, and it protects your platen from any inks or adhesives that might bleed through.
- Pressing: Close the press and lock it down. The timer will begin automatically. Do not open the press until the timer reaches zero. The combination of heat, time, and pressure is a precise science; interrupting it will lead to a failed transfer.
- Peeling: Once the timer beeps, open the press. Now comes a critical step: the peel. Some transfers, like most standard HTV, are "hot peel," meaning you remove the carrier sheet immediately. Others are "warm peel" or "cold peel," requiring you to wait a few seconds or until the item has cooled completely. Peeling at the wrong temperature can cause the design to lift off the fabric or have an improper finish. Always follow the manufacturer's specific instructions.
- Finishing: After peeling, some professionals like to do a quick 2-3 second post-press with a protective sheet over the design. This can help to further set the design into the fabric, improving durability and feel.
Quality Control: How to Avoid Common Printing Errors
The difference between an amateur and a professional lies in their attention to detail and their commitment to quality. Learning to identify, prevent, and fix common errors is a vital part of your journey.
- Uneven Application or Peeling: This is often caused by insufficient or uneven pressure. Ensure your press is locked down firmly and that there are no seams, zippers, or collars creating an uneven surface on the platen. A pressing pillow can be inserted inside a shirt to raise the print area and ensure even pressure.
- Scorching or Discoloration: This happens when the temperature is too high or the time is too long for the specific fabric. This is especially common with heat-sensitive materials like polyester. Always use the recommended settings and a protective sheet.
- Ghosting or Blurry Edges: This blurry or doubled-up look, particularly with sublimation, is caused by the transfer paper shifting as the press is opened or closed. Using heat-resistant tape to secure the paper is the best prevention.
- Vinyl Not Sticking: If your heat transfer vinyl is not adhering properly, it could be due to several factors: incorrect temperature, insufficient pressure, or trying to apply it to an incompatible fabric (e.g., attempting to press standard HTV onto nylon without using a special nylon-compatible vinyl).
Keep a notebook dedicated to your projects. Record the item, the type of transfer used, and the exact time, temperature, and pressure settings. When you achieve a perfect result, you have a repeatable recipe for success. When you encounter a failure, you have data to help you diagnose the problem. This systematic approach will accelerate your learning curve and is a hallmark of a serious heat press business.
Step 5: Mastering the Craft of Heat Transfer
Operating a heat press is a skill; mastering the craft of heat transfer is an art informed by science. It requires moving beyond simply following instructions to developing a deep, intuitive understanding of your materials. This means learning how different types of transfers behave, why certain fabrics react differently to heat, and how the precise interplay of time, temperature, and pressure is the key to unlocking professional-grade results. This deeper knowledge allows you to troubleshoot with confidence, experiment with creativity, and consistently produce items that are not just decorated, but beautifully and durably crafted.
A Deep Dive into Transfer Types: HTV, Sublimation, and DTF
Your heat press is the engine, but the transfer media are the fuel. The three most common methods for small-scale production are Heat Transfer Vinyl (HTV), Dye-Sublimation, and Direct-to-Film (DTF). Each has a unique character.
-
Heat Transfer Vinyl (HTV): Think of HTV as a specialized sticker for fabric. It is a sheet of polyurethane material with a heat-activated adhesive on one side. You use a vinyl cutter to cut your design into the sheet, "weed" away the excess material, and then press it onto the garment.
- Pros: HTV is excellent for simple, bold graphics and text. It comes in an incredible variety of finishes—glossy, matte, glitter, flock (felt-like), metallic, and even glow-in-the-dark. It can be applied to a wide range of fabrics, including cotton, polyester, and blends of any color.
- Cons: The design sits on top of the fabric, so you can feel its texture. It is not ideal for highly detailed, multi-color photographic images, as that would require cutting and layering many different pieces of vinyl, which can become thick and cumbersome.
-
Dye-Sublimation: This process is more like a chemical transformation. It uses special inks that, when heated, turn into a gas and permeate the surface of polyester or polymer-coated materials. The ink becomes a permanent part of the substrate itself.
- Pros: The result is a completely smooth, untouchable finish with vibrant, full-color photographic quality. The design will never crack, peel, or fade. It is perfect for athletic apparel (which is typically polyester) and hard-surface items like mugs, coasters, and phone cases that have a special polymer coating.
- Cons: Sublimation has two major limitations. It only works on light-colored (preferably white) substrates, as the inks are transparent and will not show up on dark surfaces. It also only binds with polyester, so it cannot be used on 100% cotton garments.
-
Direct-to-Film (DTF): DTF is a newer, hybrid technology that combines the best features of HTV and sublimation. The process involves printing a design onto a special film, coating the wet ink with a powdered adhesive, and then curing it. This creates a ready-to-press transfer that can be applied to a huge range of materials.
- Pros: DTF allows for vibrant, full-color, and intricate designs, much like sublimation. However, it can be applied to almost any fabric, including cotton, polyester, leather, and blends, of any color—light or dark. The resulting transfer has great stretchability and a soft feel.
- Cons: The initial equipment setup for DTF (a specialized printer, powder, and curing oven or heat press) can be more complex and costly than a basic HTV or sublimation setup. The process has more steps than the other two methods.
The Science of Time, Temperature, and Pressure
These three variables are the pillars of heat pressing. A failure in one will compromise the entire structure of your design. Understanding their relationship is not optional.
- Temperature: The heat is what activates the adhesive on HTV or turns sublimation ink into a gas. Too little heat, and the transfer will not adhere properly. Too much heat, and you risk scorching the fabric or burning the adhesive, making it brittle.
- Time: This is the duration for which the heat is applied. It must be long enough for the transfer process to complete. Too short a time will result in a weak bond. Too long can also lead to scorching or can cause the dyes in a colored shirt to "migrate" into the transfer design.
- Pressure: Pressure ensures firm contact between the transfer and the substrate, allowing the heat to be distributed evenly and pushing the design into the weave of the fabric. Too little pressure results in an incomplete transfer, while too much pressure can cause the adhesive to squeeze out from the edges of the design or leave a permanent press mark on the garment.
Every combination of transfer type and substrate has its own ideal "recipe." A comprehensive guide is a valuable resource for any heat press operator (Galaxy Press, 2025). Here is a general reference table, but you must always default to the specific instructions from your material's manufacturer.
| Material Combination | Temperature Range | Time Range | Pressure | Notes |
|---|---|---|---|---|
| Standard HTV on Cotton | 150-160°C (300-320°F) | 10-15 seconds | Medium-Firm | Hot or cold peel, check specs. |
| Glitter HTV on Cotton/Poly | 160-165°C (320-330°F) | 15-20 seconds | Firm | Typically a hot peel. |
| Sublimation on Polyester | 195-205°C (385-400°F) | 45-60 seconds | Light-Medium | Do not use firm pressure. |
| Sublimation on Mugs | 195-205°C (385-400°F) | 180-240 seconds | Firm | Requires a dedicated mug press. |
| DTF Transfers | 140-165°C (285-330°F) | 10-15 seconds | Medium | Typically a cold peel. |
Working with Different Substrates
Your heat press can decorate more than just t-shirts. Exploring different substrates opens up new product lines and creative possibilities. However, each material presents its own unique considerations.
- Cotton: A natural and forgiving fiber. It handles heat well and is compatible with almost all types of HTV and DTF transfers. It is a staple for any heat press business.
- Polyester: The required material for sublimation. It is also more sensitive to heat than cotton. Using too high a temperature can leave a permanent shine or press mark. This is where precise temperature control and using a protective sheet become paramount.
- Blends (e.g., 50/50 Cotton/Poly): These popular fabrics offer the comfort of cotton and the durability of polyester. They are compatible with HTV and DTF. For sublimation, the result will have a faded, "vintage" look, as the ink only binds to the polyester fibers. This can be a desirable aesthetic in itself.
- Ceramics (Mugs, Tiles): These must have a special polymer sublimation coating to be decorated. They require a dedicated mug press or tile jig and much longer press times to allow the heat to penetrate the dense material.
- Hats: The curved surface of a hat requires a specialized curved platen, found on a hat heat press machine or as an attachment for a combo press. The challenge is ensuring even pressure across the entire design.
Experimentation is part of the learning process. Keep a collection of "scrap" materials—old t-shirts, extra mugs—to test new transfer types or settings before committing to a valuable blank product. This practice will save you money, reduce waste, and build your expertise.
Step 6: Building Your Brand and Marketing Your Products
Creating a beautiful, high-quality product is only half the equation. The other half is connecting that product with the people who will value and purchase it. Marketing is not about loud, aggressive selling; it is the art of storytelling and relationship-building. It is how you communicate the value of your craft, build a reputation for quality and creativity, and turn your heat press business from a hidden workshop into a recognized brand. In today's interconnected world, you have a powerful array of tools at your disposal to reach customers both locally and globally.
Creating a Simple Online Presence
You do not need a complex, expensive website to start. Your initial online presence can be built effectively using social media platforms that are popular in your target region. Platforms like Instagram, Facebook, and even TikTok are highly visual, making them perfect for showcasing custom apparel and accessories.
-
Instagram: This is your visual portfolio. Create a dedicated business account. Focus on taking high-quality, well-lit photos of your products. Do not just show the item on a plain background; show it being worn by a person, or styled in an interesting way. Use a mix of feed posts, stories (for behind-the-scenes content like the pressing process), and Reels (short videos showing off a finished product). Use relevant hashtags that combine local terms (e.g., #CustomTeesDubai) with broader terms (#HeatPressBusiness, #PersonalizedGifts).
-
Facebook: Facebook is excellent for community building. Join local buy-and-sell groups, community forums, and groups for small business owners in your city. You can share your creations, announce special promotions, and engage directly with potential customers. A Facebook Page also serves as a hub for your business information, including contact details, product catalogs, and customer reviews.
-
E-commerce Platforms: As you grow, consider platforms like Etsy, Shopify, or local equivalents. These provide a more formal and streamlined way for customers to browse your entire catalog, place orders, and make secure payments.
The key to social media is consistency and engagement. Post regularly, respond to comments and messages promptly, and show the human side of your brand. People are not just buying a t-shirt; they are buying from you.
Photography and Product Presentation
In online commerce, your product photos are your storefront. Grainy, poorly lit images will make even the highest quality product look cheap. You do not need a professional photography studio, but you do need to pay attention to a few basics.
- Lighting: Natural light is your best friend. Take photos near a large window during the day. Avoid harsh, direct sunlight, which creates strong shadows. An overcast day provides a perfect, soft, diffused light.
- Background: Use a clean, simple background that does not distract from the product. A plain white wall, a piece of poster board, or a textured wooden surface can work well.
- Styling: Create mockups. Instead of just laying a t-shirt flat, use a mockup template (many are available online) to show what the design looks like on a model. For mugs or hats, create a small "scene" with related props—a mug next to a book and a pair of glasses, or a hat on a table with sunglasses and a map. This helps customers imagine the product in their own lives.
Think of each photo as telling a small story about the product and the person who would love it.
Local Marketing Strategies
While the internet gives you global reach, your local community is your most immediate and powerful market. Do not underestimate the value of face-to-face interaction and local partnerships.
- Local Markets and Fairs: Renting a booth at a craft fair, farmer's market, or local festival is one of the best ways to get your products directly in front of customers. It allows them to see and feel the quality of your work firsthand. It also gives you invaluable feedback as you see which designs people are most drawn to.
- Collaborations: Partner with other local businesses. Could you create branded t-shirts for a popular local coffee shop? Could you offer custom mugs as part of a gift basket sold by a local gourmet food store? These collaborations expose your brand to an established customer base.
- Corporate and Community Outreach: Prepare a simple portfolio with examples of your best work and approach local businesses, schools, and non-profits. Offer your services for their staff uniforms, event merchandise, or fundraising campaigns. A single corporate client can provide a steady stream of income for your heat press business.
Building a brand is a gradual process. It is built one quality product, one positive review, and one happy customer at a time. Your marketing efforts should reflect the same care and creativity that you put into every item you press.
Step 7: Scaling and Growing Your Heat Press Business
Launching your business is a significant achievement, but the journey does not end there. The final step is a continuous cycle of growth, refinement, and adaptation. Scaling is not simply about getting bigger; it is about getting smarter, more efficient, and more profitable. It involves looking critically at what is working and what is not, reinvesting in your success, and strategically expanding your capabilities. This is where your venture evolves from a startup into a mature, resilient enterprise capable of long-term success.
Analyzing Your Profits and Reinvesting
To grow, you must understand your financial health with absolute clarity. This requires moving beyond just tracking your sales and expenses. You need to analyze your profitability on a per-product basis. Which items in your catalog have the highest profit margins? Which ones are your bestsellers? Are there products that are popular but have very low margins, or products with high margins that are not selling well?
Use this data to guide your decisions. You might decide to:
- Focus your marketing on your most profitable items.
- Look for ways to reduce the cost of your bestsellers, perhaps by ordering blanks in larger quantities to get a bulk discount.
- Discontinue or re-price items that are not contributing significantly to your bottom line.
A portion of your profits should be systematically reinvested back into the business. This is the fuel for your growth. Your first reinvestments might be in more inventory or a small marketing budget. As you become more established, you can plan for larger investments, such as upgrading your equipment or expanding your workspace. A disciplined approach to financial analysis and reinvestment is the engine that will drive your business forward.
Expanding Your Product Line
As your business gains traction, you will see opportunities to expand your offerings. This expansion should be strategic, not random. Listen to your customers. Are they asking for different types of apparel, like hoodies or tank tops? Are they interested in personalized items for children? Customer requests are a direct line to market demand.
Upgrading or adding to your equipment is a primary way to facilitate this expansion. If you started with a basic clamshell press for t-shirts, adding a dedicated mug press machine could open up the entire personalized drinkware market. If you find yourself turning down orders for hats, investing in a hat heat press becomes a logical next step. For those who began with a multifunction unit, scaling might mean purchasing a larger, more robust flat press to handle bigger orders more efficiently, while still using the combo attachments for specialty items. An advanced, professional heat press can significantly increase your production speed and consistency, allowing you to take on larger, more lucrative corporate or team orders.
Customer Service and Building a Loyal Following
In the world of custom products, excellent customer service is your most powerful marketing tool. A happy customer is likely to return for future purchases and, more importantly, to recommend your business to their friends, family, and colleagues. Word-of-mouth marketing is authentic, powerful, and free.
Building a loyal following involves several key practices:
- Communication: Be clear and responsive. Confirm orders promptly. Provide realistic production and shipping timelines. If there is a delay, communicate it proactively.
- Quality Assurance: Double-check every item before it goes out the door. Is the design centered? Is the application flawless? Is it the correct size and color? A small mistake caught in your workshop saves you from dealing with a disappointed customer later.
- Problem Resolution: Even with the best processes, mistakes can happen. When they do, own them. Respond to complaints with empathy and a focus on finding a solution. Offering a reprint or a discount can turn a negative experience into a demonstration of your commitment to customer satisfaction.
Ultimately, the growth of your heat press business is a reflection of the trust you build. By consistently delivering high-quality products, providing exceptional service, and strategically reinvesting in your capabilities, you create a positive feedback loop that fosters customer loyalty and ensures the long-term health and prosperity of your creative enterprise.
Frequently Asked Questions (FAQ)
What is the most profitable item to sell in a heat press business? Profitability often lies in specialized niches rather than a single item. While t-shirts are a high-volume staple, items like custom mugs, high-performance athletic wear, and corporate-branded polo shirts can command higher profit margins due to perceived value and lower competition. The most profitable item is one that aligns with a strong market demand you have identified.
How much does it truly cost to start a heat press business in 2025? Startup costs can range widely, from around $1,500 USD for a basic home setup to over $7,000 USD for more professional equipment. The main expenses are the heat press machine itself, a printer for your chosen transfer method (sublimation or DTF), a computer with design software, and an initial inventory of blank products and transfer materials.
Can I use a regular household iron instead of a heat press? While an iron can be used for some iron-on transfers as a hobby, it is not suitable for a professional business. A heat press provides the consistent, high temperature and heavy, even pressure that are required for durable, professional-quality results that will not peel or fade after washing (HTVRONT, 2025). An iron cannot replicate these conditions reliably.
What is the main difference between sublimation and HTV? The primary difference is how the design interacts with the fabric. Heat Transfer Vinyl (HTV) is a layer of material that sits on top of the fabric. Dye-sublimation uses special ink that turns into a gas and permanently infuses the fibers of polyester fabric, resulting in a design with no feel or texture. Sublimation is for light-colored polyester, while HTV works on most fabrics of any color.
How do I properly maintain my heat press machine? Regular maintenance is simple but vital. Keep the heat platen clean by wiping it down with a soft cloth when it is cool. Use a protective Teflon or parchment sheet during pressing to prevent ink and adhesive from sticking to the platen. Periodically check that the pressure is even across the platen and ensure all electrical connections are secure.
Which type of heat press is best for a beginner? A quality clamshell press is often a great starting point for beginners due to its smaller footprint and affordability. However, a multifunction or combo heat press is arguably the best choice for a new business, as it provides the versatility to experiment with pressing t-shirts, mugs, hats, and plates with a single machine, allowing you to discover your most profitable product lines.
Conclusion
The journey to establishing a thriving heat press business is one of both creative expression and disciplined strategy. It begins not with the heat of the press, but with the thoughtful work of understanding your community and identifying a niche where your unique vision can serve a genuine need. By building upon this foundation with a solid business plan, the careful selection of appropriate equipment, and a commitment to mastering the technical craft, you transform a simple machine into a powerful engine for entrepreneurship. The path requires dedication to quality, from sourcing the best materials to ensuring every product that leaves your workshop is a testament to your skill. By embracing marketing as a form of storytelling and prioritizing customer satisfaction above all else, you do not just sell products; you build relationships and a reputation. The steps outlined here provide a map, but the passion, creativity, and resilience you bring to the journey will ultimately determine your success.
References
Allprintheads.com. (2024, May 25). How to use a heat press machine: 7 easy steps to get started. allprintheads.com
Galaxy Press. (2024, May 31). Heat press machine 101: Your ultimate guide to getting started. galaxy-press.com
Galaxy Press. (2024, October 17). How to use a heat press: The only guide you’ll ever need for perfect transfers!. galaxy-press.com
Galaxy Press. (2025, January 14). The ultimate heat press guide: Mastering temperature and time settings. galaxy-press.com
HeatPressLeader. (2025, April 3). The best heat press machines of 2024: Our top 5 picks.
HTVRONT. (2025, February 25). The ultimate guide to HTVRONT heat press settings (2025 edition). htvront.com
Xheatpress. (2025, January 1). How to use a 8 in 1 heat press (Step-by-step instruction for t-shirts, hats and mugs). xheatpress.com